Gate.io Register

How to Register Account on Gate.io
How to Register Account on Gate.io with Email or Phone Number
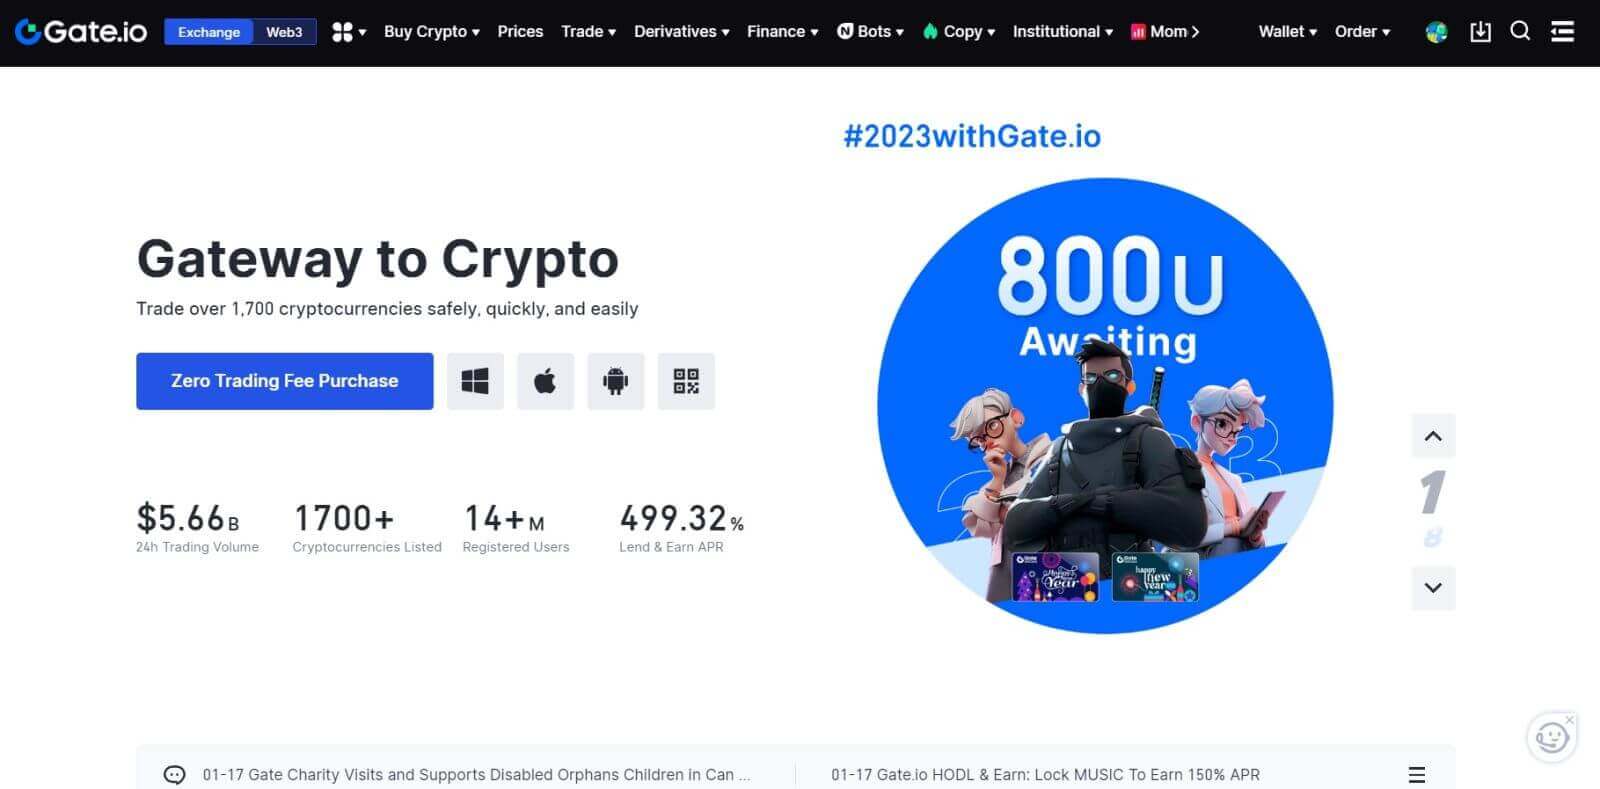
1. Go to the Gate.io website and click on [Sign Up].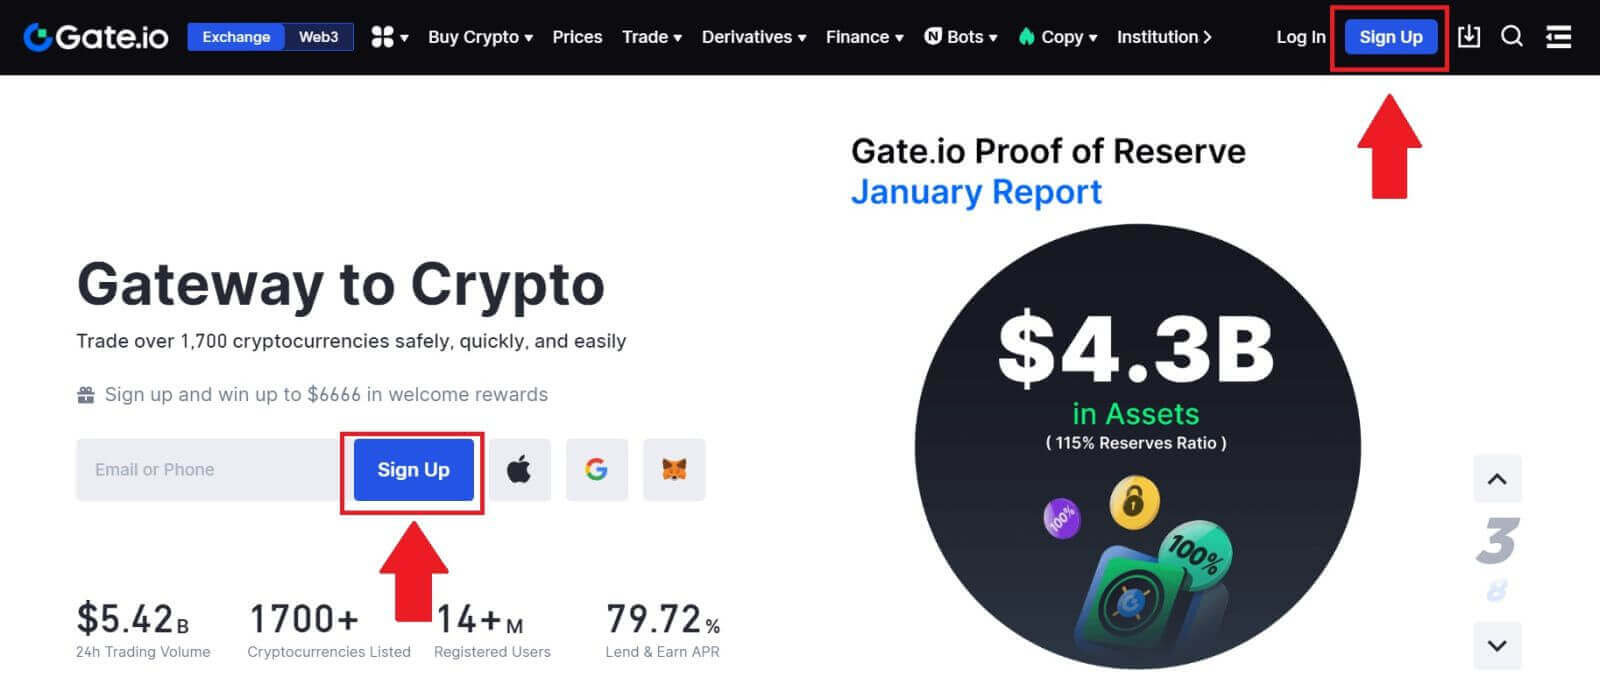
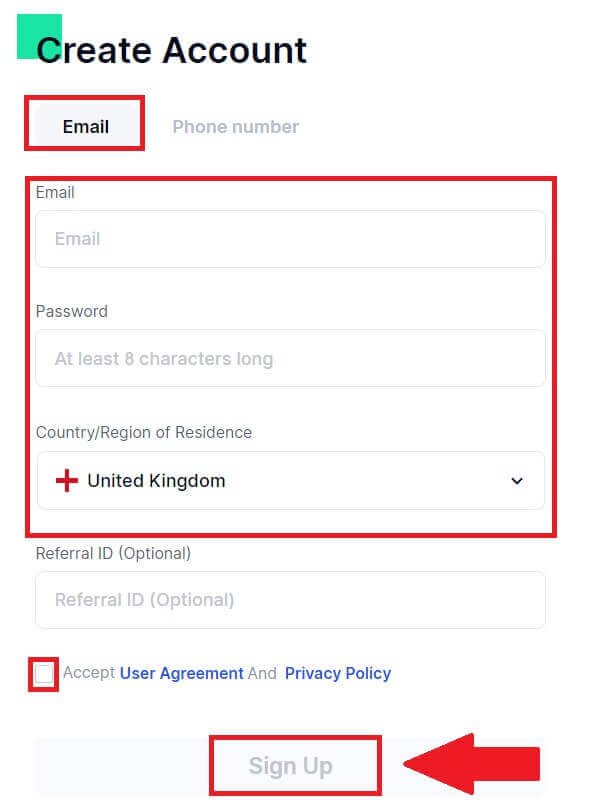
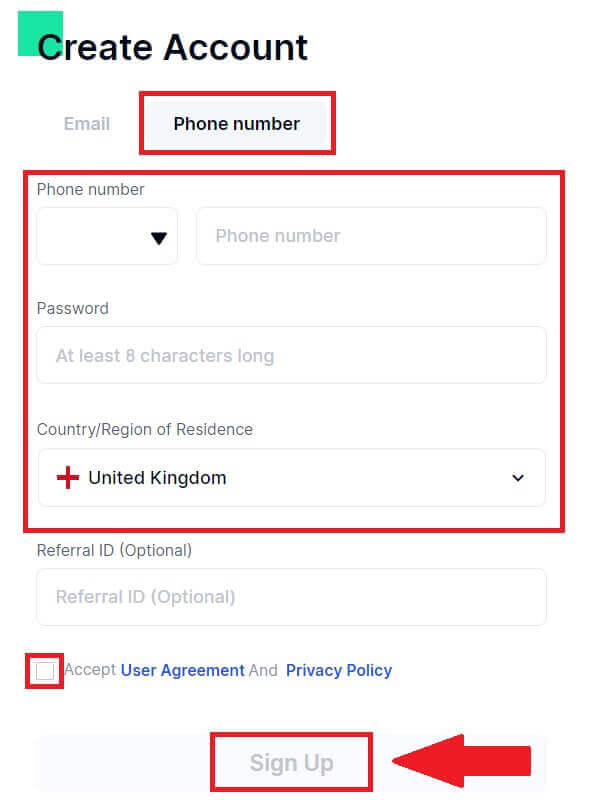
2. Select [Email] or [Phone number] and enter your email address or phone number. Then, create a secure password for your account.
Choose your [Country/Region of Residence], tick on the box, and click on [Sign Up].
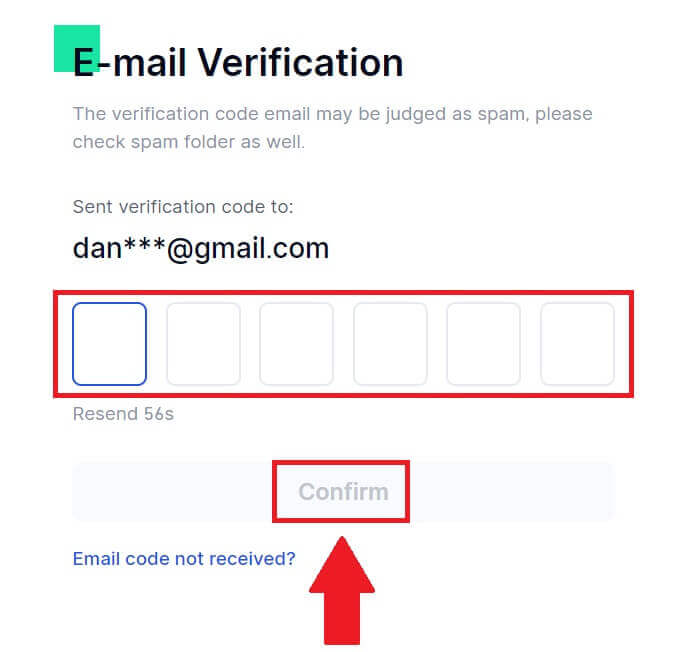
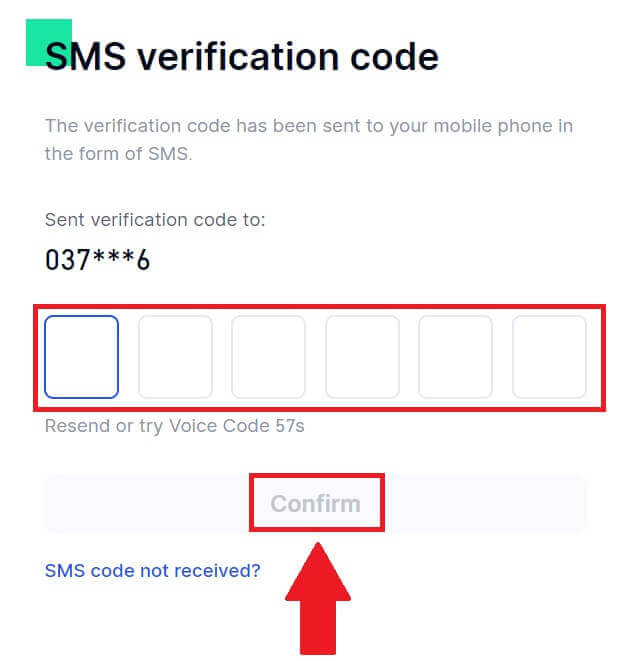
3. A verification window pops up and fill in the verification code. You will receive a 6-digit verification code in your email or phone. Then, click the [Confirm] button.
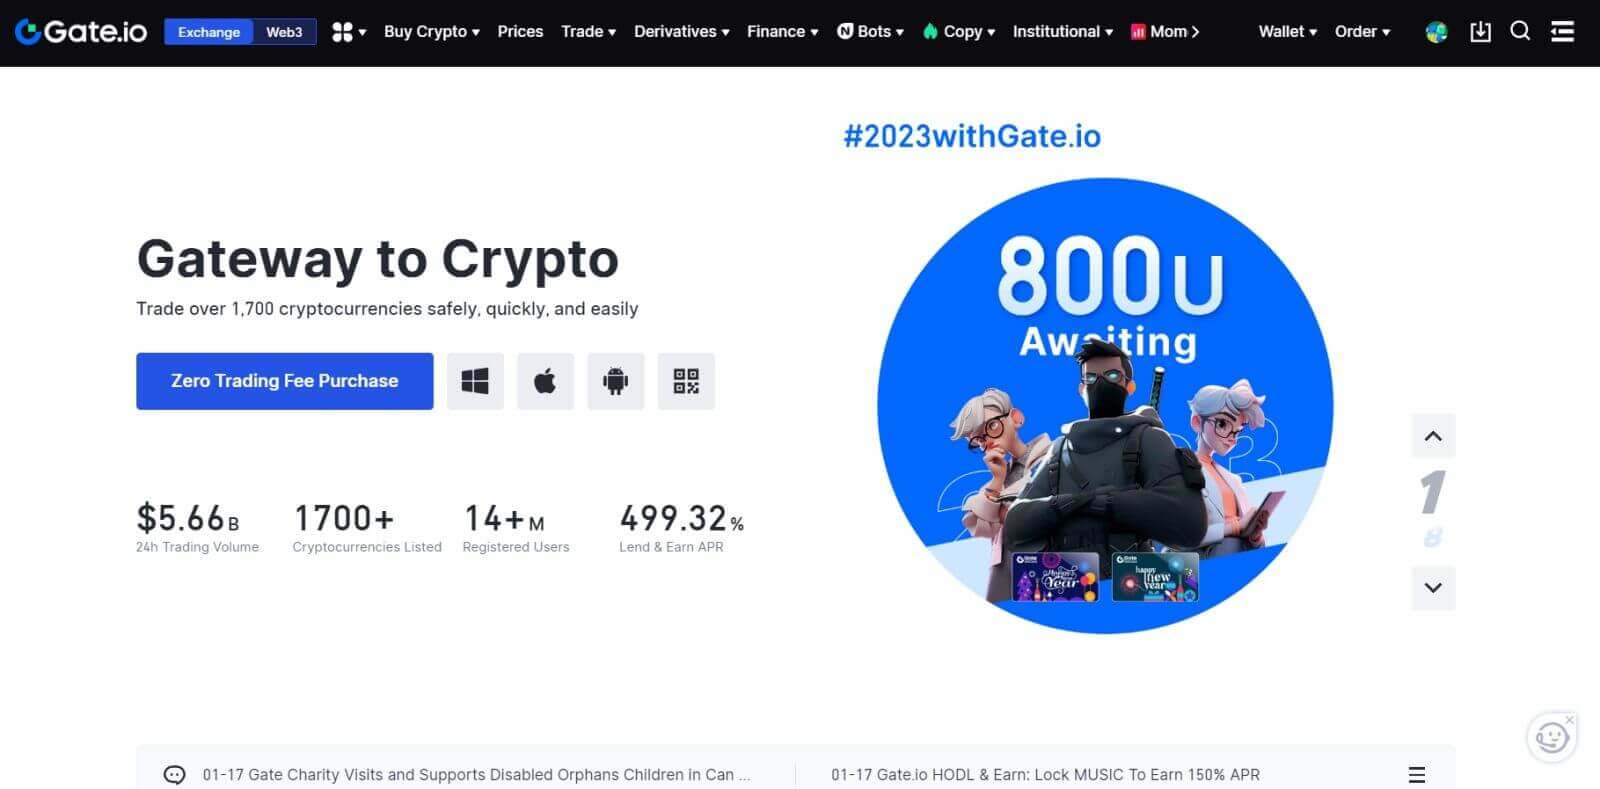
4. Congratulations! You have successfully created a Gate.io account via Email or Phone Number.
How to Register Account on Gate.io with Google
1. Go to the Gate.io website and click on [Sign Up].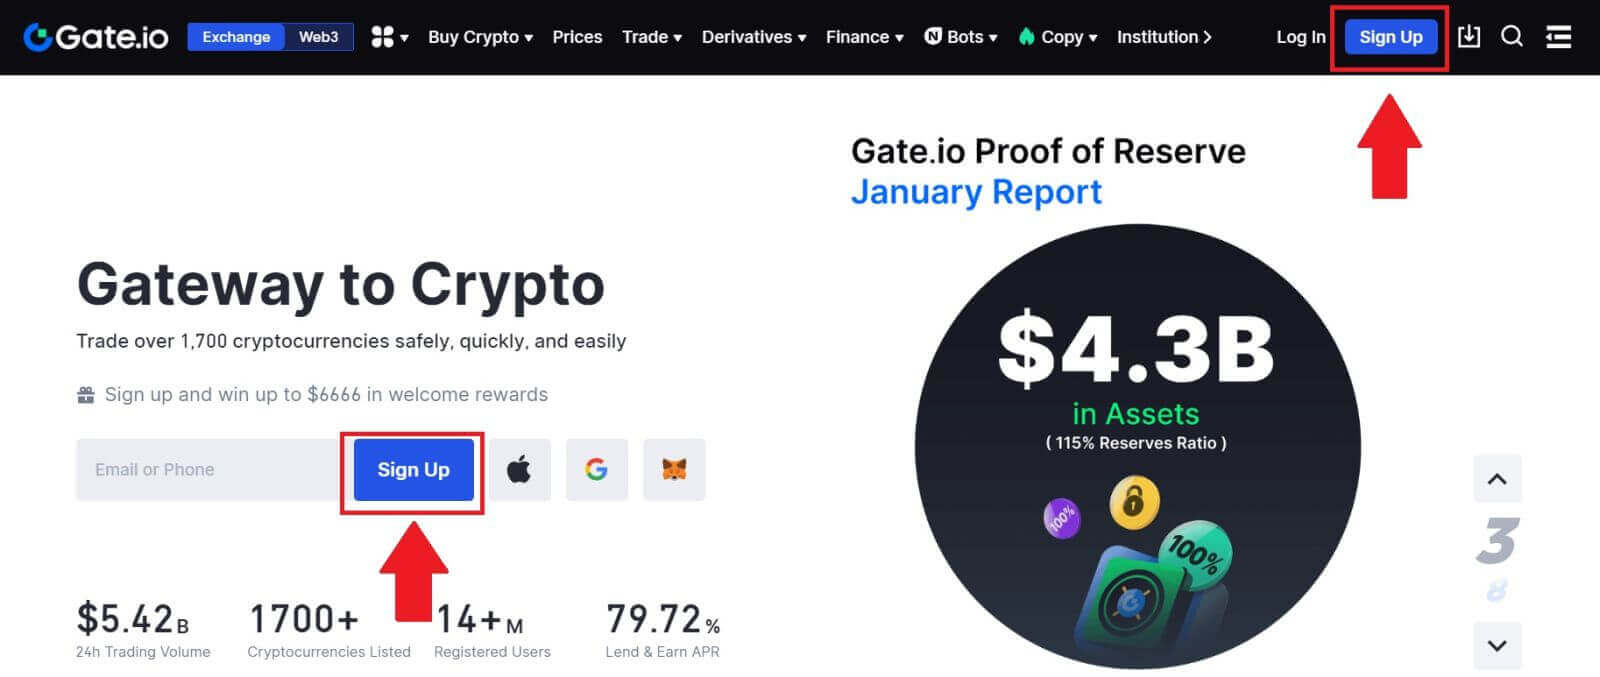
2. Scroll down to the bottom of the sign-up page and click on the [Google] button.
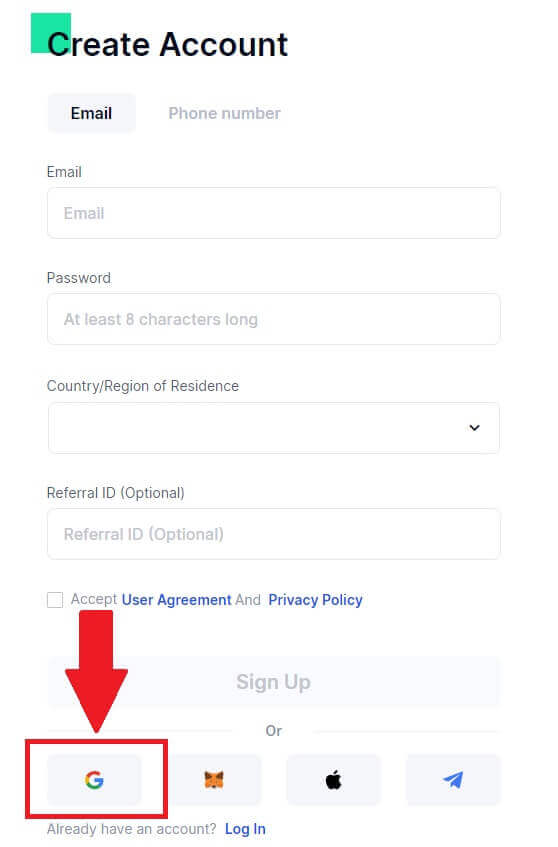
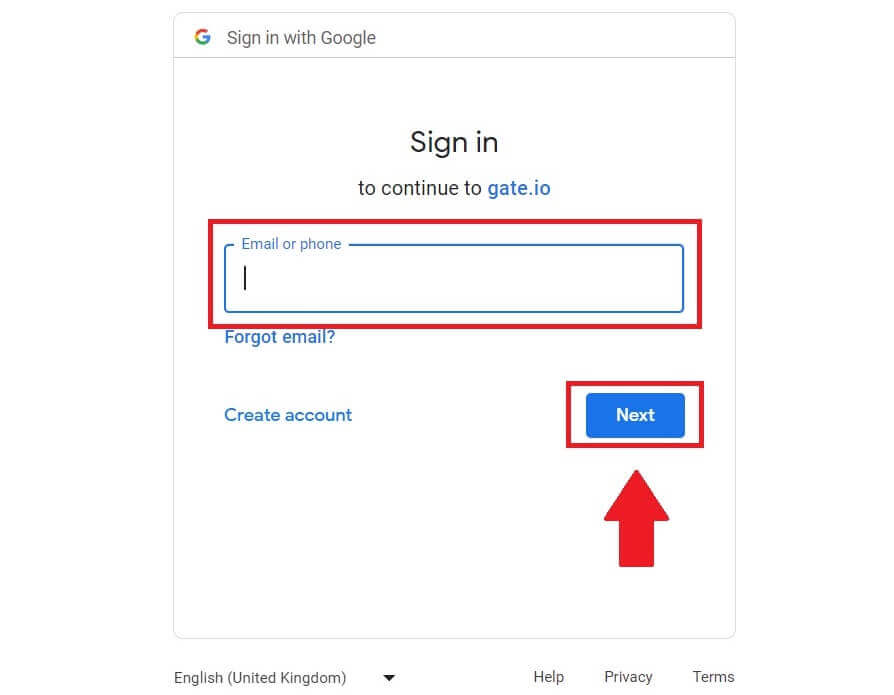
3. A sign-in window will be opened, where you will need to enter your Email address or Phone and click on [Next].
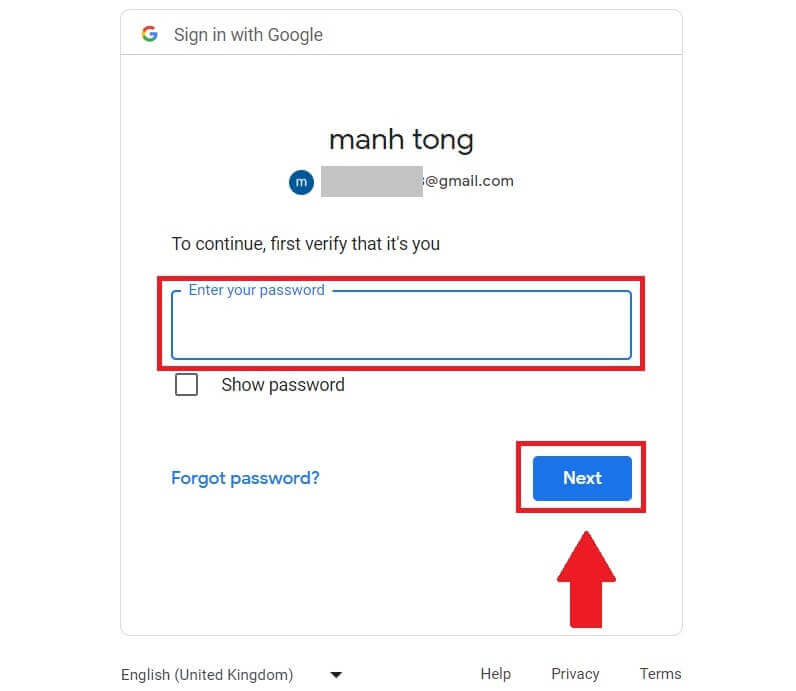
4. Then enter the password for your Google account and click [Next].
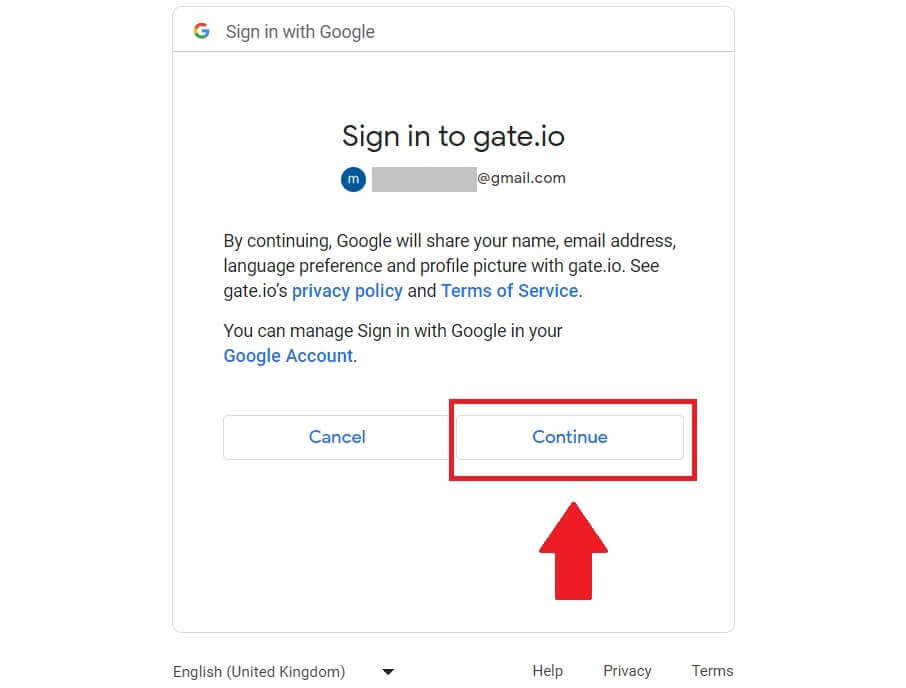
5. Click on [Continue] to confrim to sign in with your Google account.
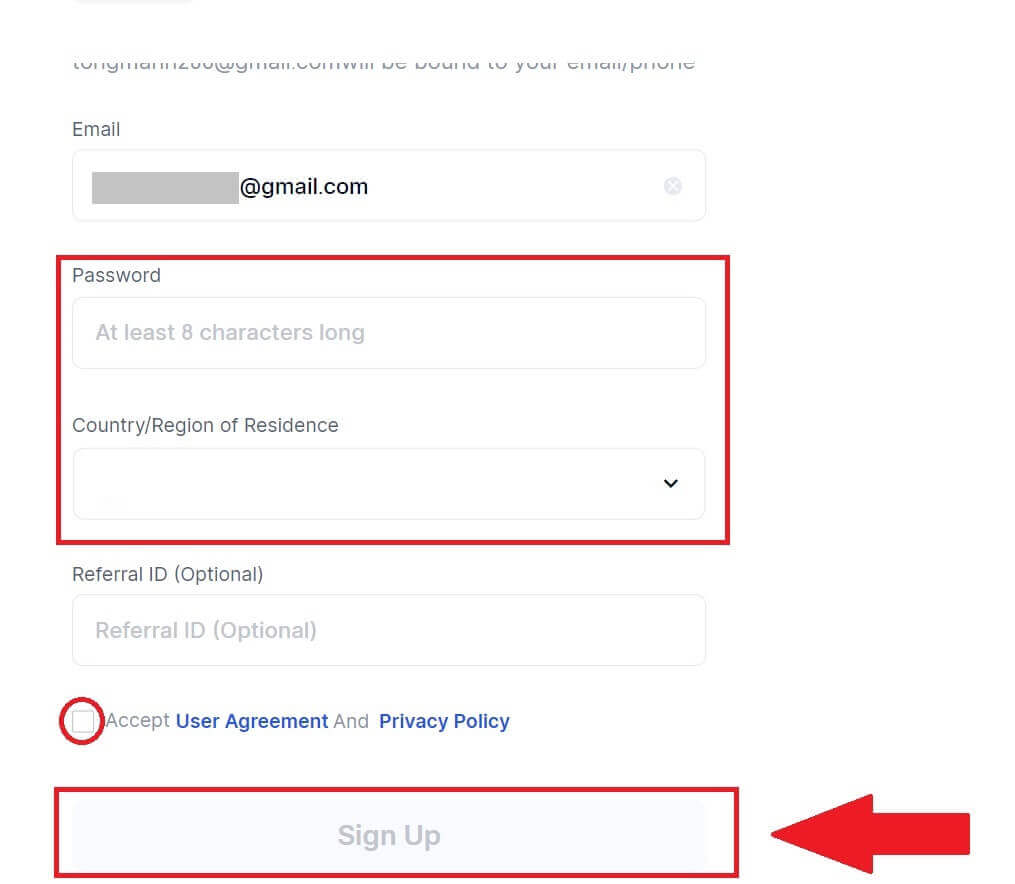
6. Fill in your information to create a new account. Tick on the box, and then click on [Sign Up].
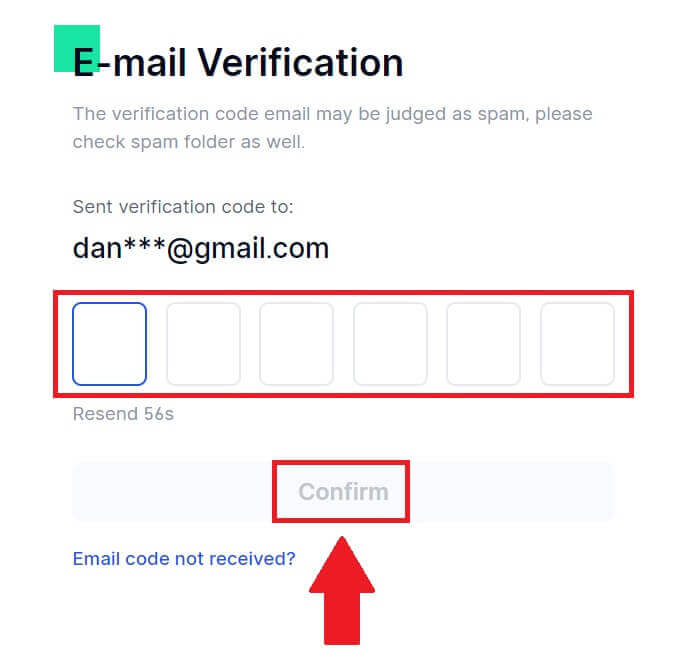
7. Complete the verification process. You will receive a 6-digit verification code in your email. Enter the code and click [Confirm].
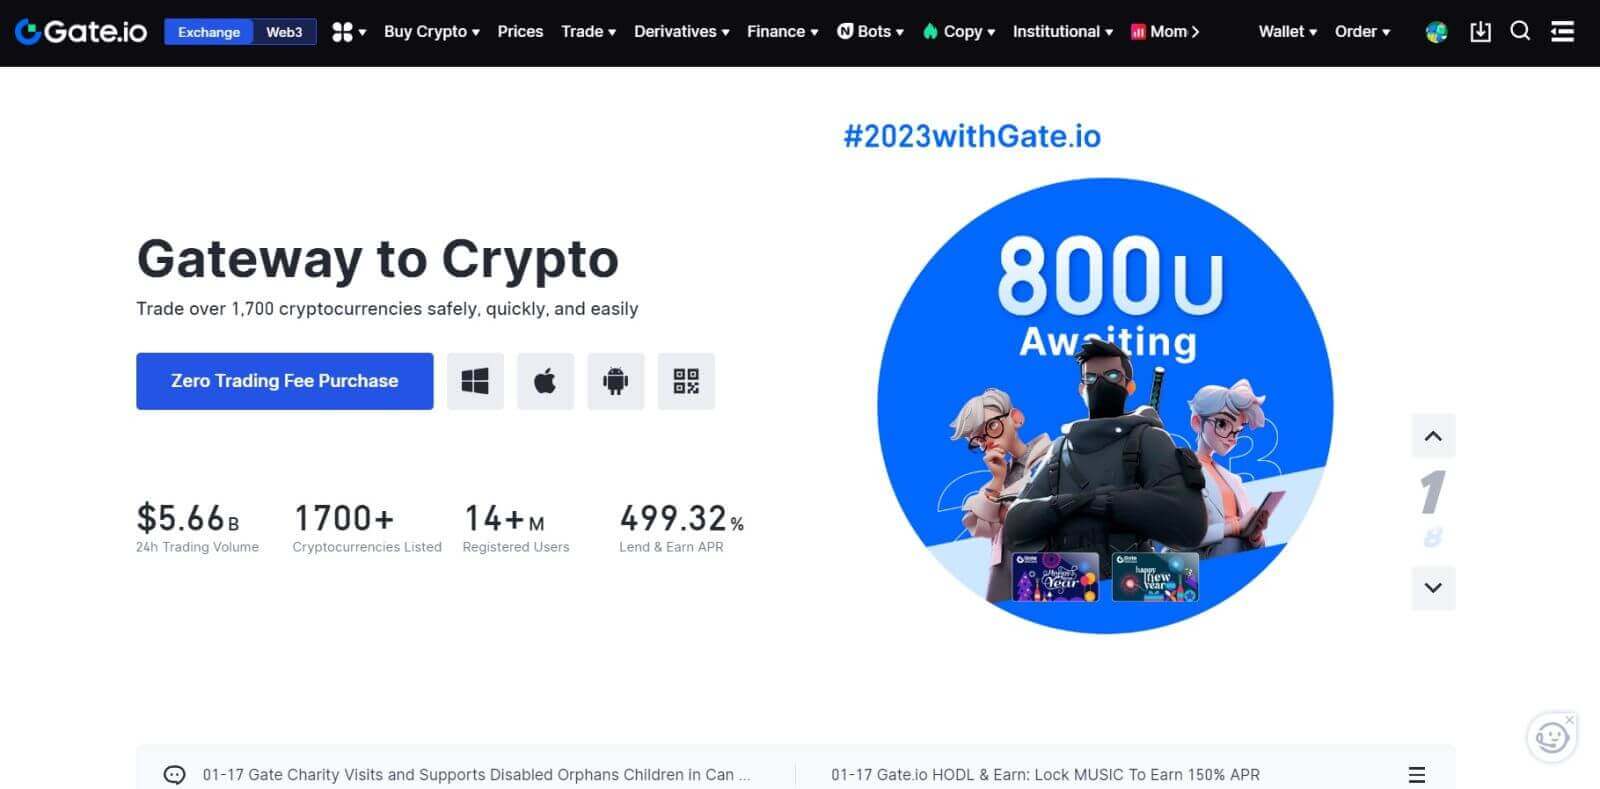
8. Congratulations! You have successfully created a Gate.io account via Goggle.
How to Register Account on Gate.io with MetaMask
Before Registering an account on Gate.io via MetaMask, you must have the MetaMask extension installed in your browser.1. Go to the Gate.io website and click on [Sign Up].
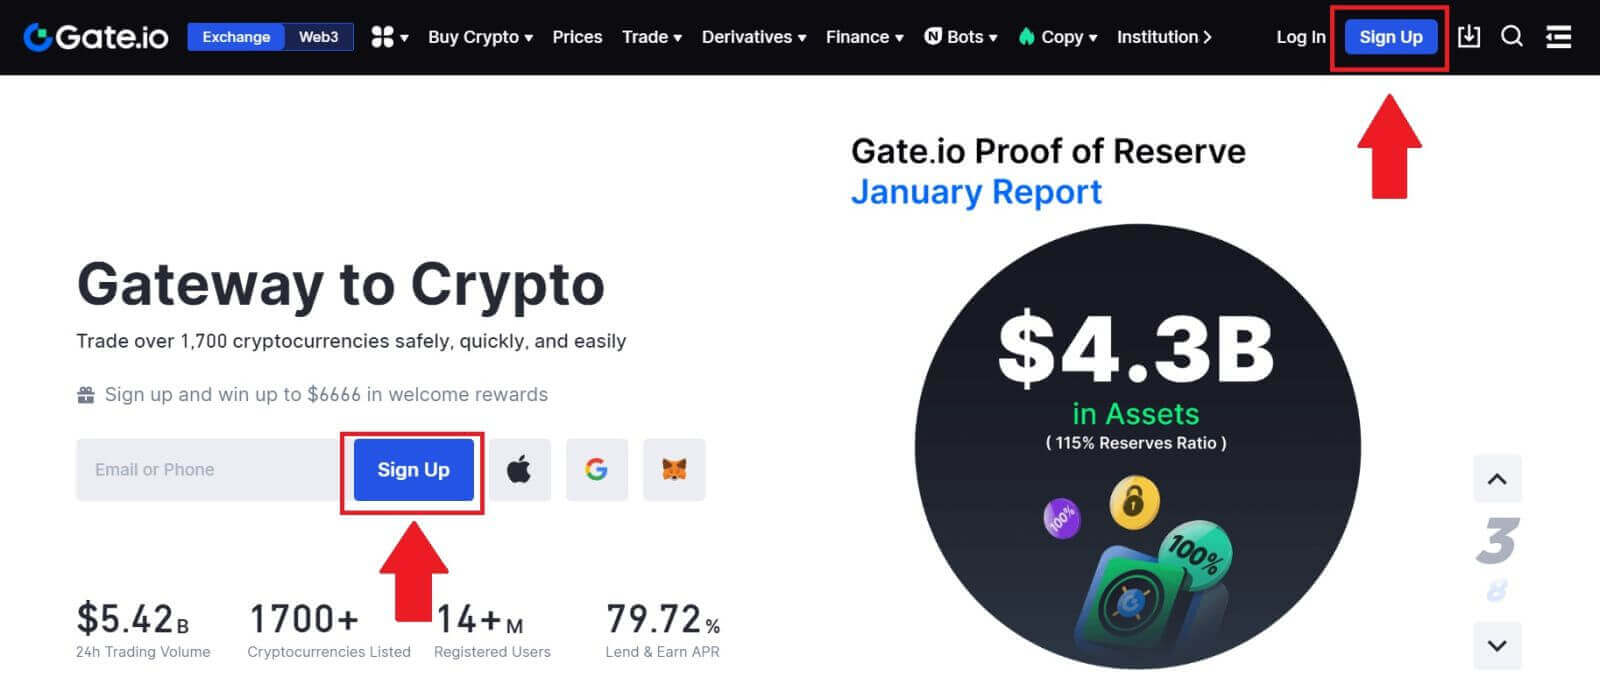
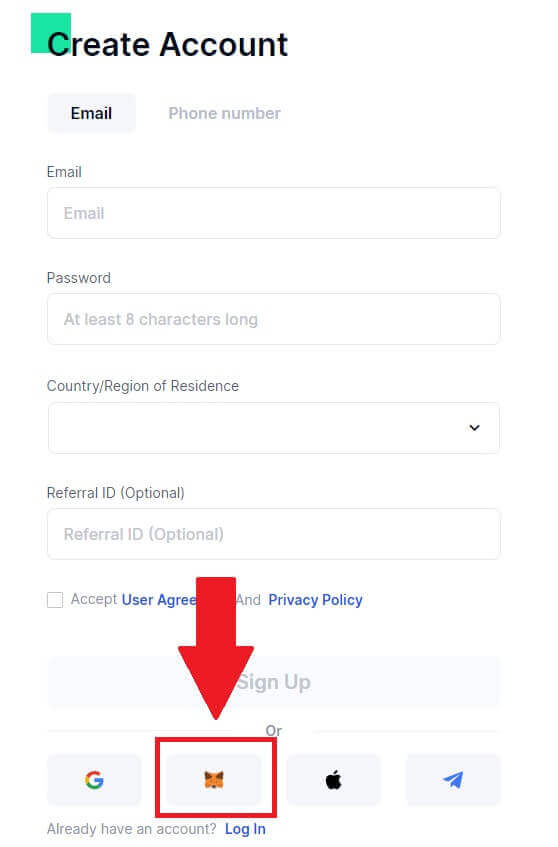
2. Scroll down to the bottom of the sign-up page and click on the [MetaMask] button.
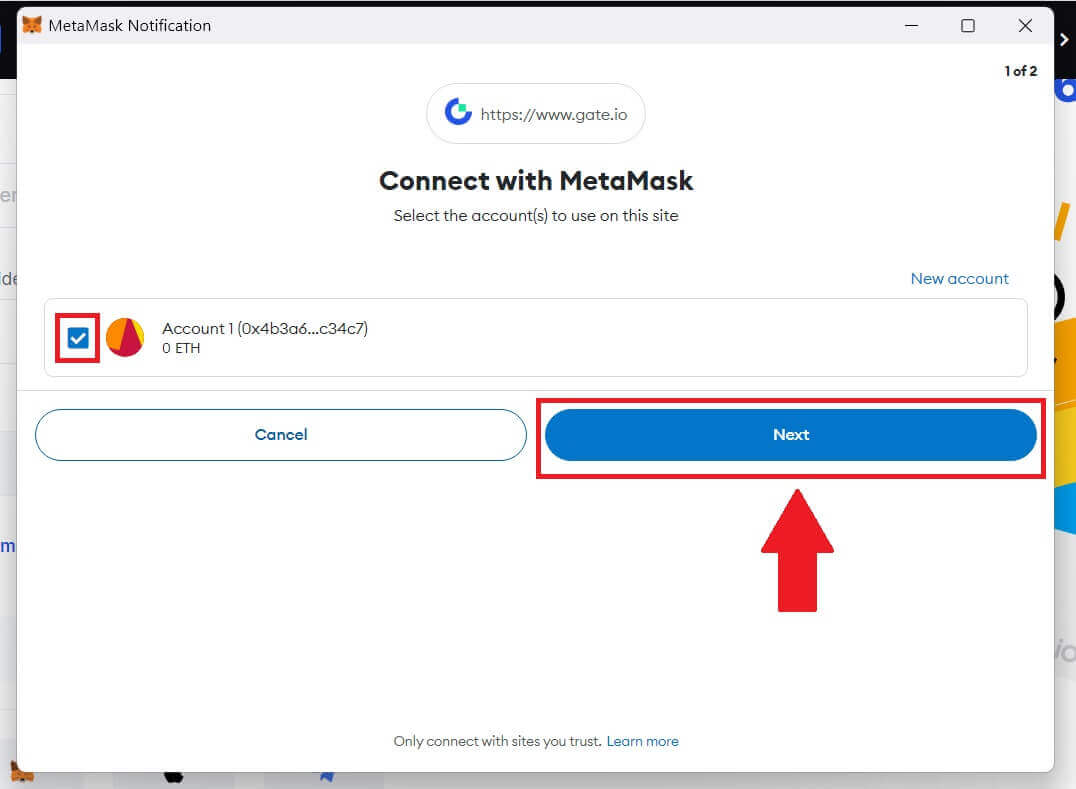
 3. A sign-in window will be opened, where you will need to connect with MetaMask, choose your account you want to connect and click [Next].
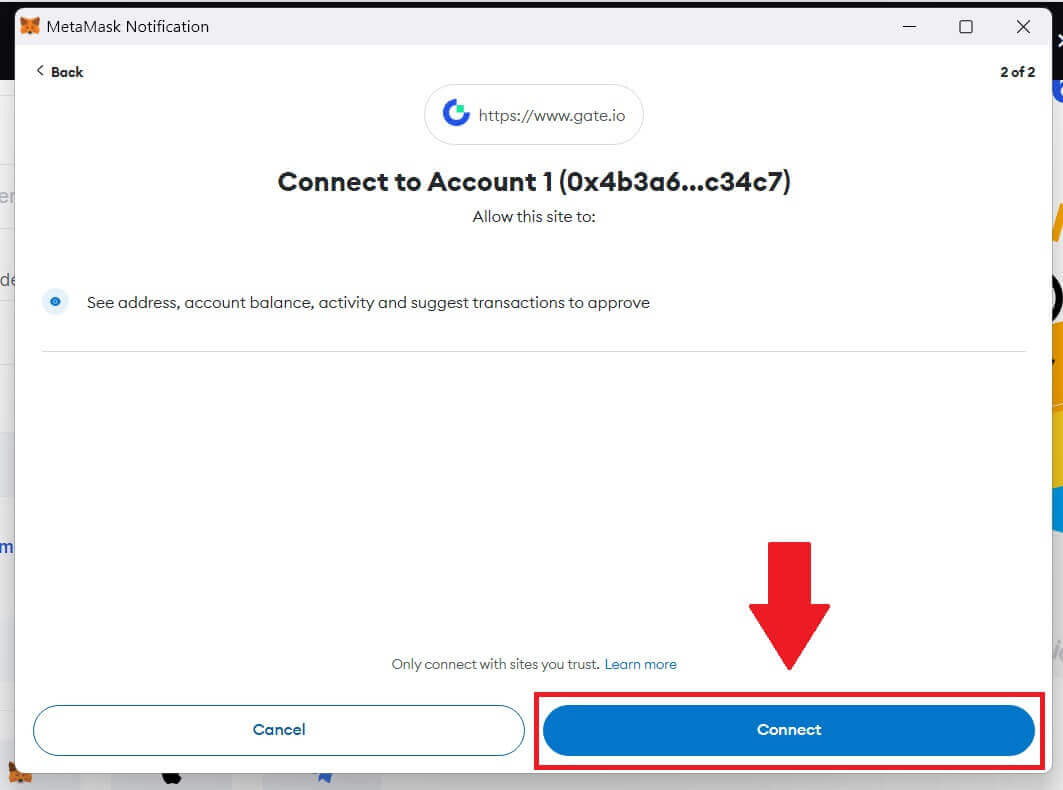
4. Click on [Connect] to connect with your chosen account.
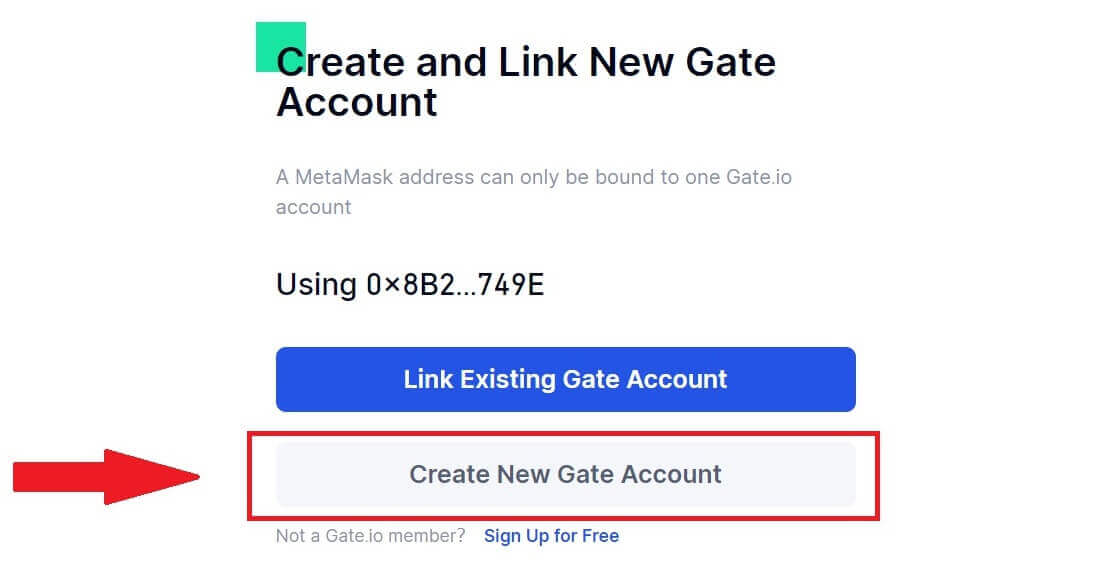
5. Click on [Create New Gate Account] to sign up using MetaMask credential.
6. Select [Email] or [Phone number] and enter your email address or phone number. Then, create a secure password for your account.
Choose your [Country/Region of Residence], tick on the box, and click on [Sign Up].
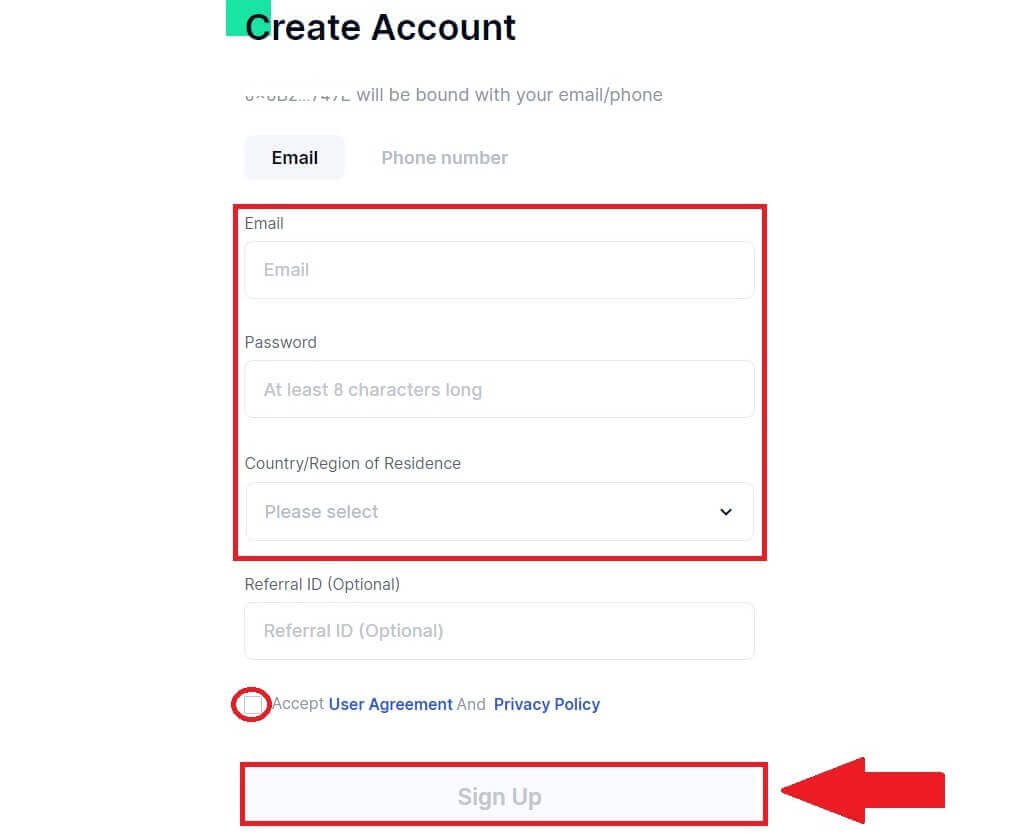
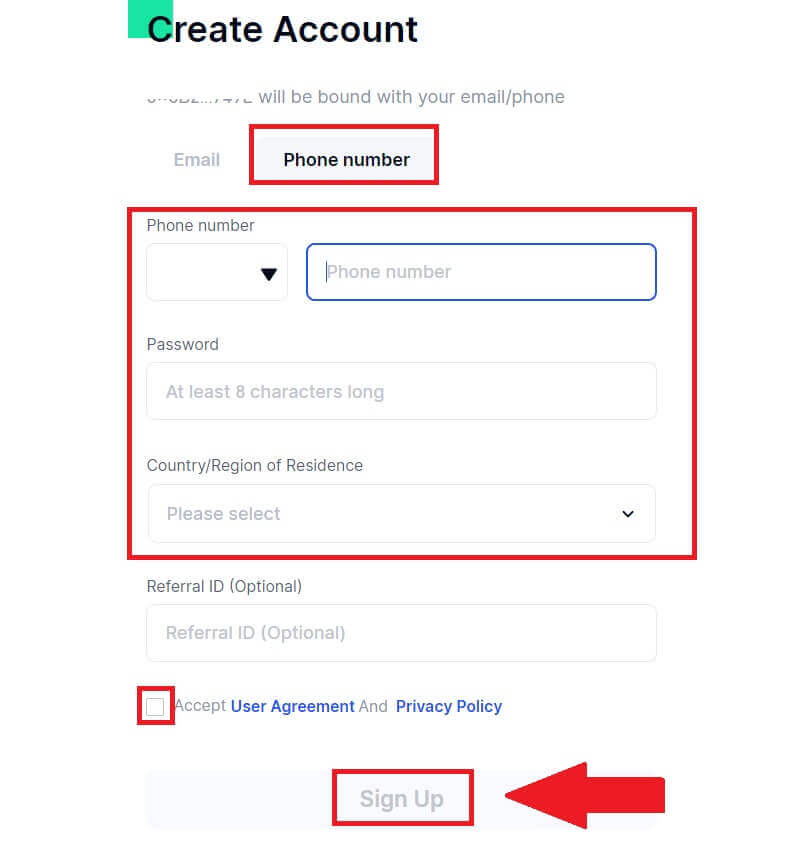
7. A verification window pops up and fill in the verification code. You will receive a 6-digit verification code in your email or phone. Then, click the [Confirm] button.
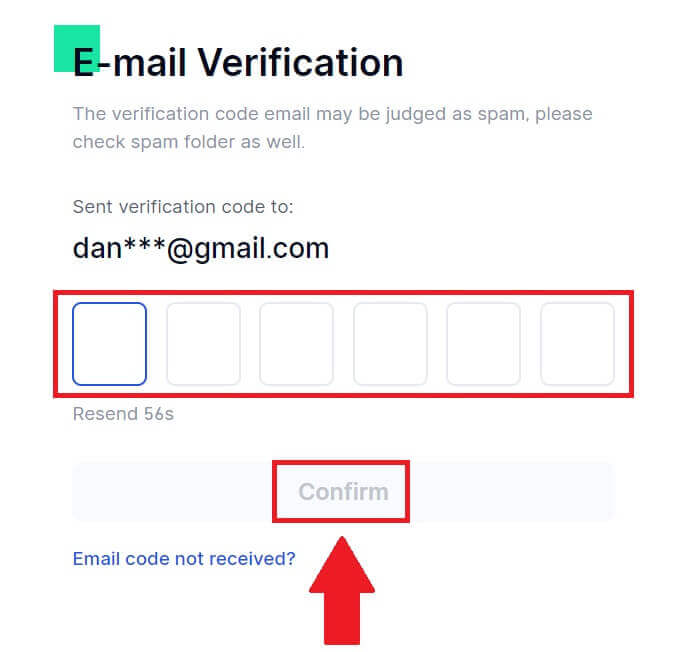
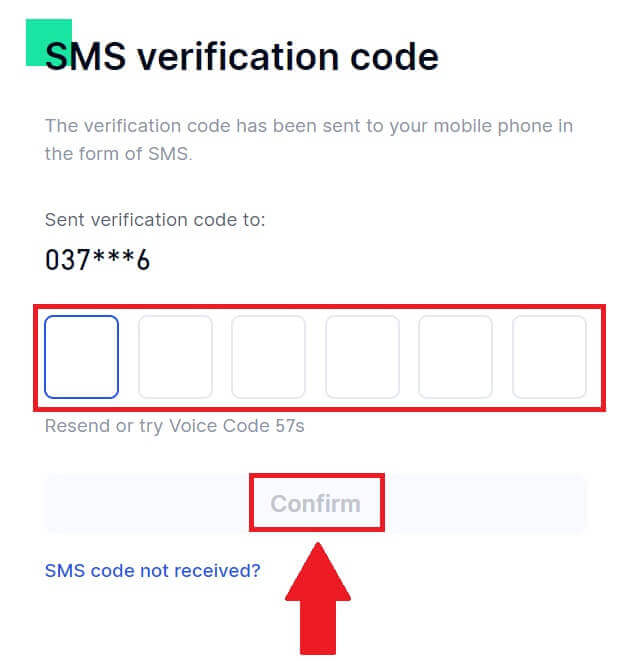
8. A MetaMask [Signature request] will pop up, click on [Sign] to continue.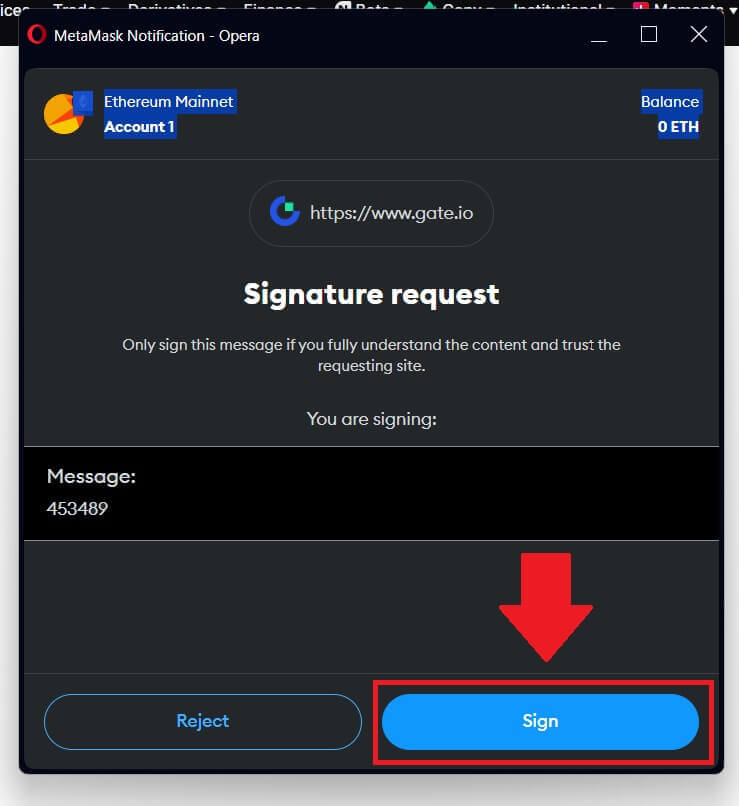
9. Congratulations! You have successfully created a Gate.io account via MetaMask.
How to Register Account on Gate.io with Telegram
1. Go to the Gate.io website and click on [Sign Up].
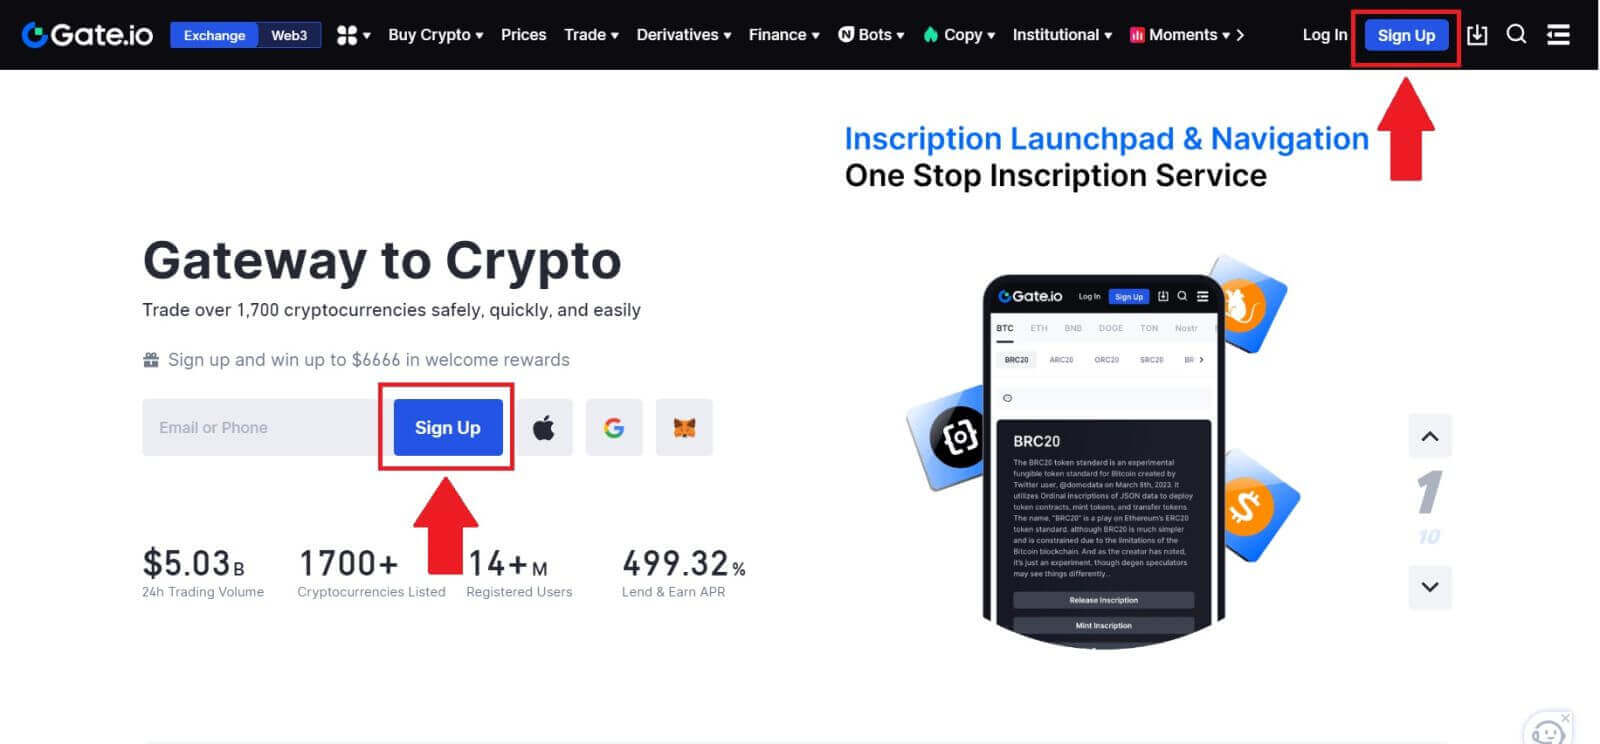
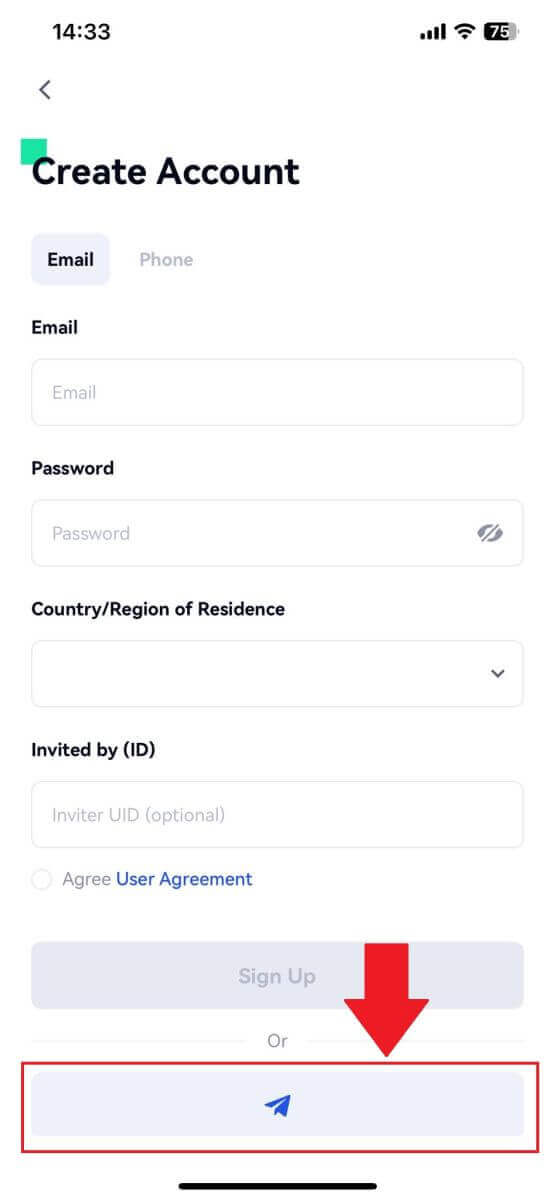
2. Scroll down to the bottom of the sign-up page and click on the [Telegram] button.
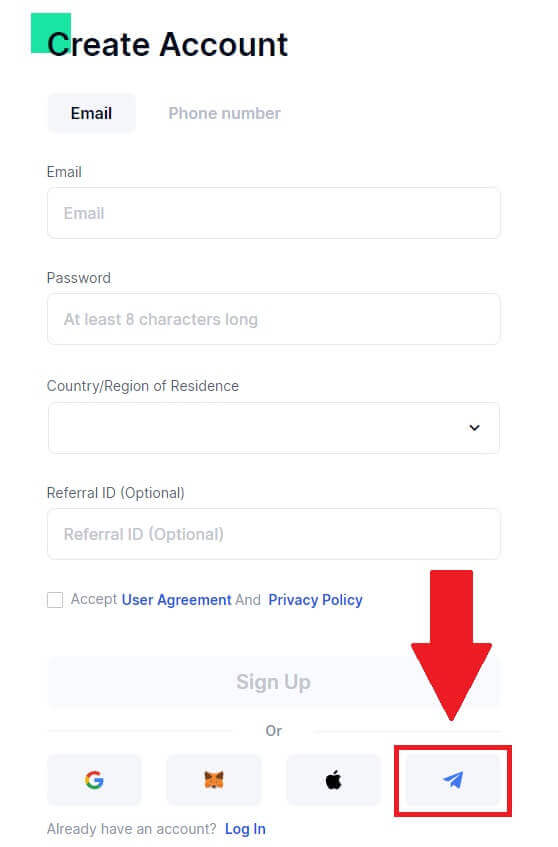
3. A pop-up window will appear, enter your Phone Number to sign up to Gate.io and click [NEXT].
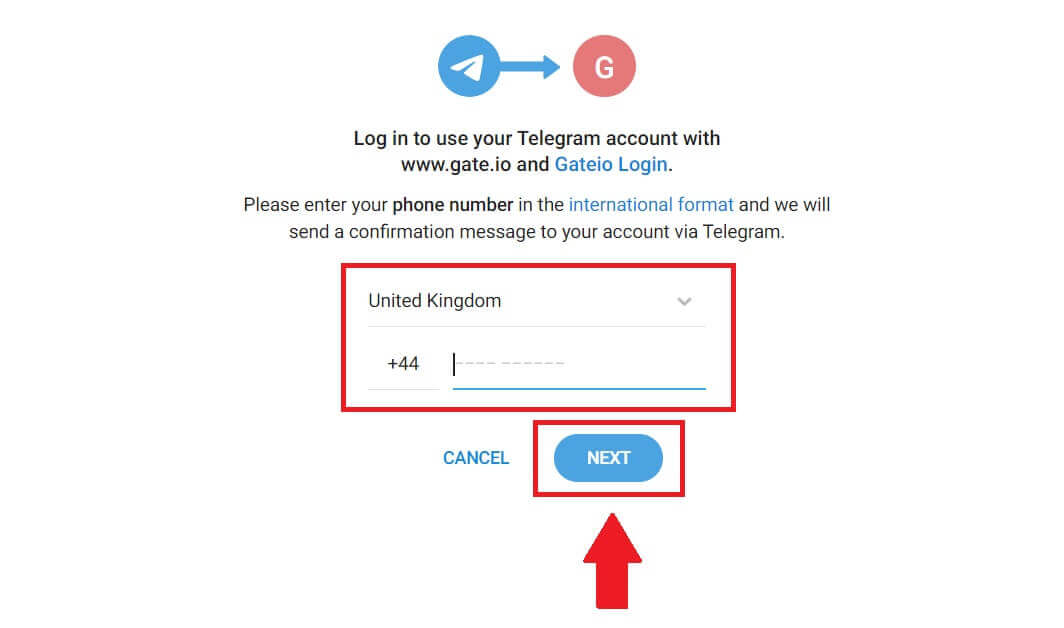
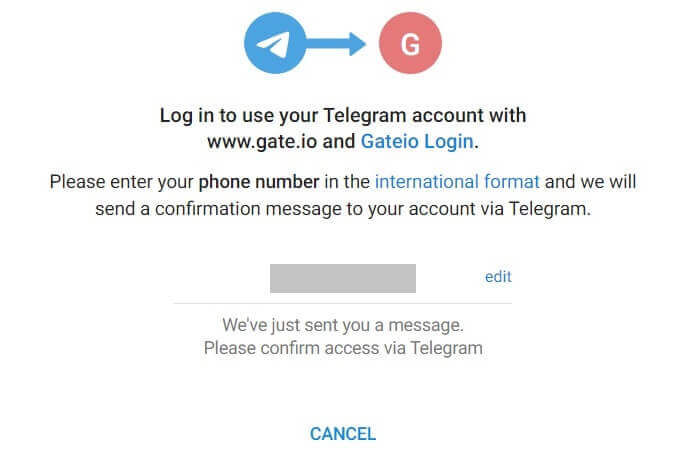
4. You will receive the request in Telegram app. Confirm that request.
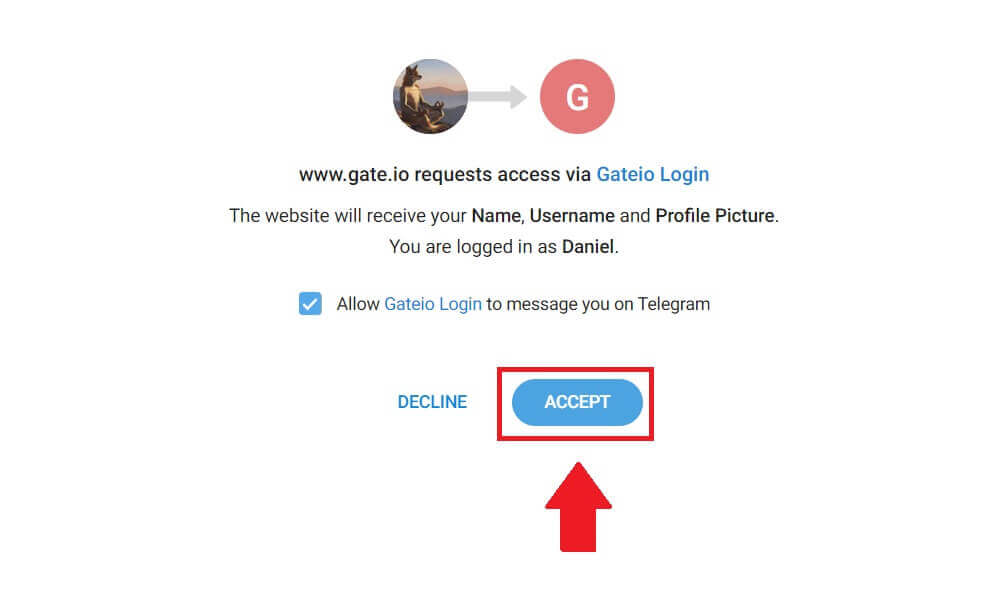
5. Click on [ACCEPT] to continue to sign up for Gate.io using Telegram credential.
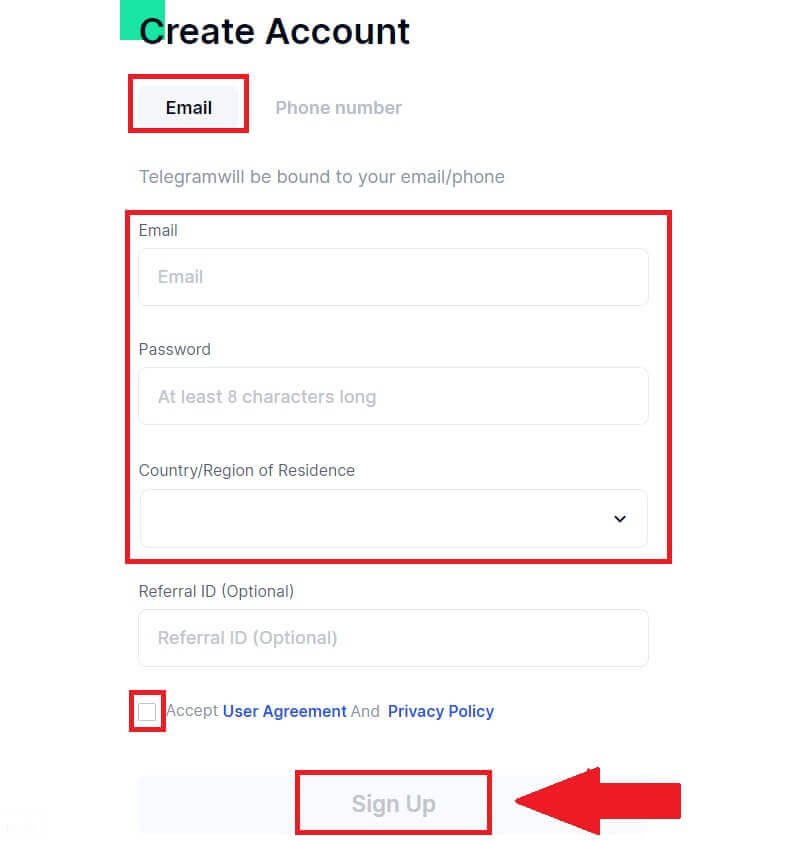
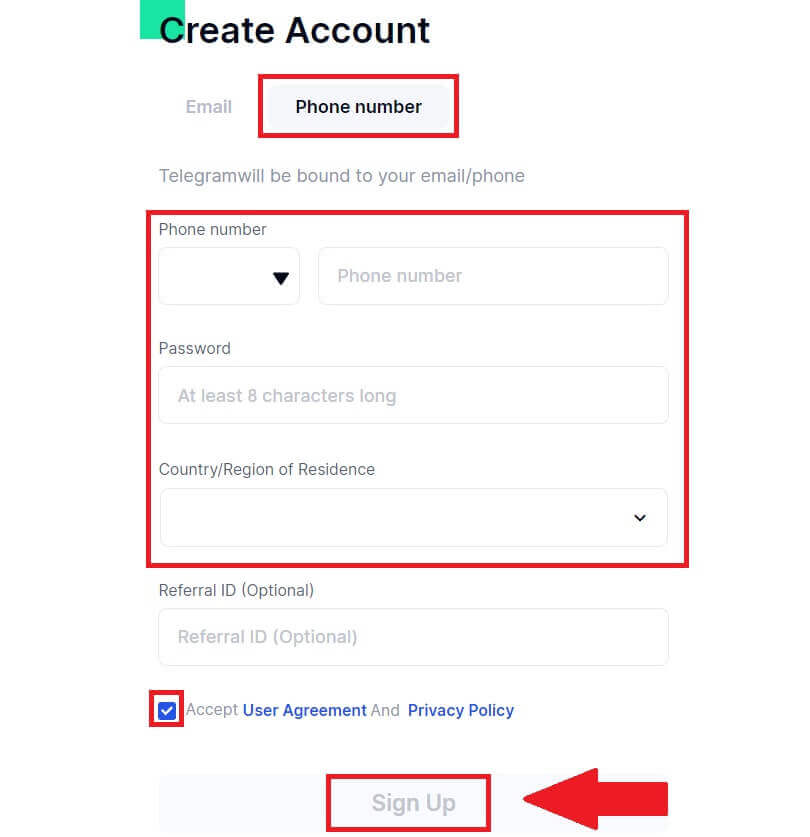
 6. Select [Email] or [Phone number] and enter your email address or phone number. Then, create a secure password for your account.
Choose your [Country/Region of Residence], tick on the box, and click on [Sign Up].
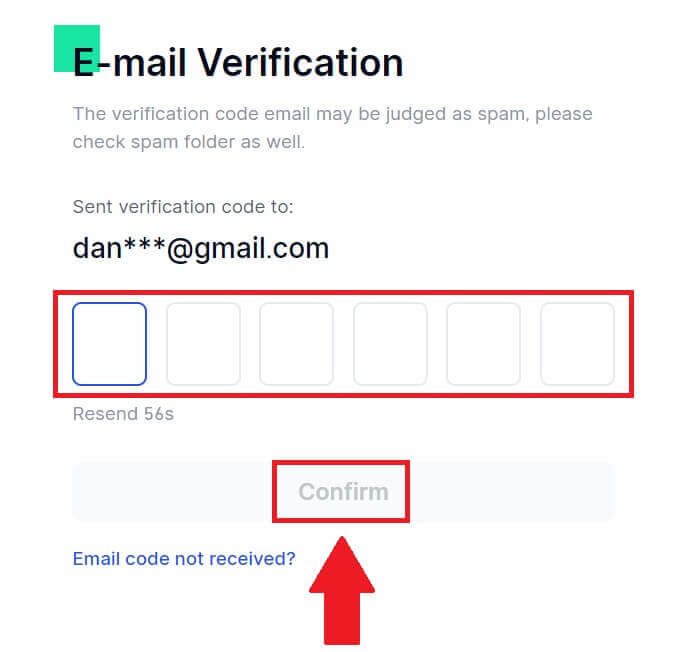
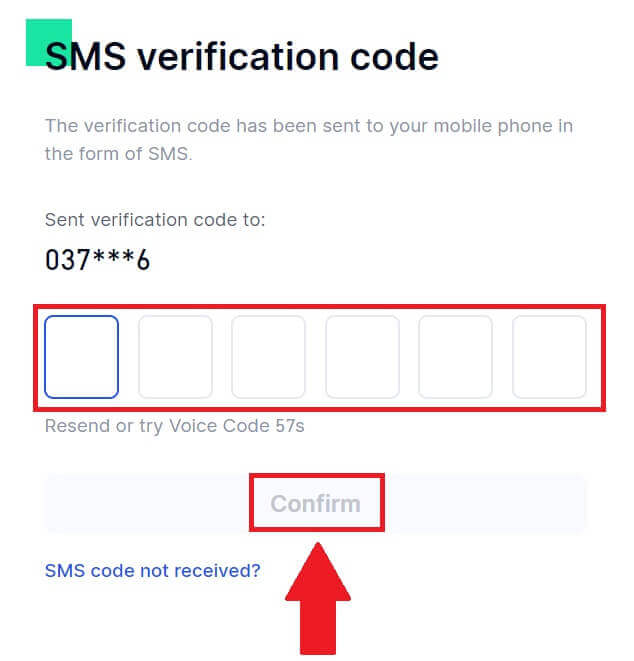
7. A verification window pops up and fill in the verification code. You will receive a 6-digit verification code in your email or phone. Then, click the [Confirm] button.
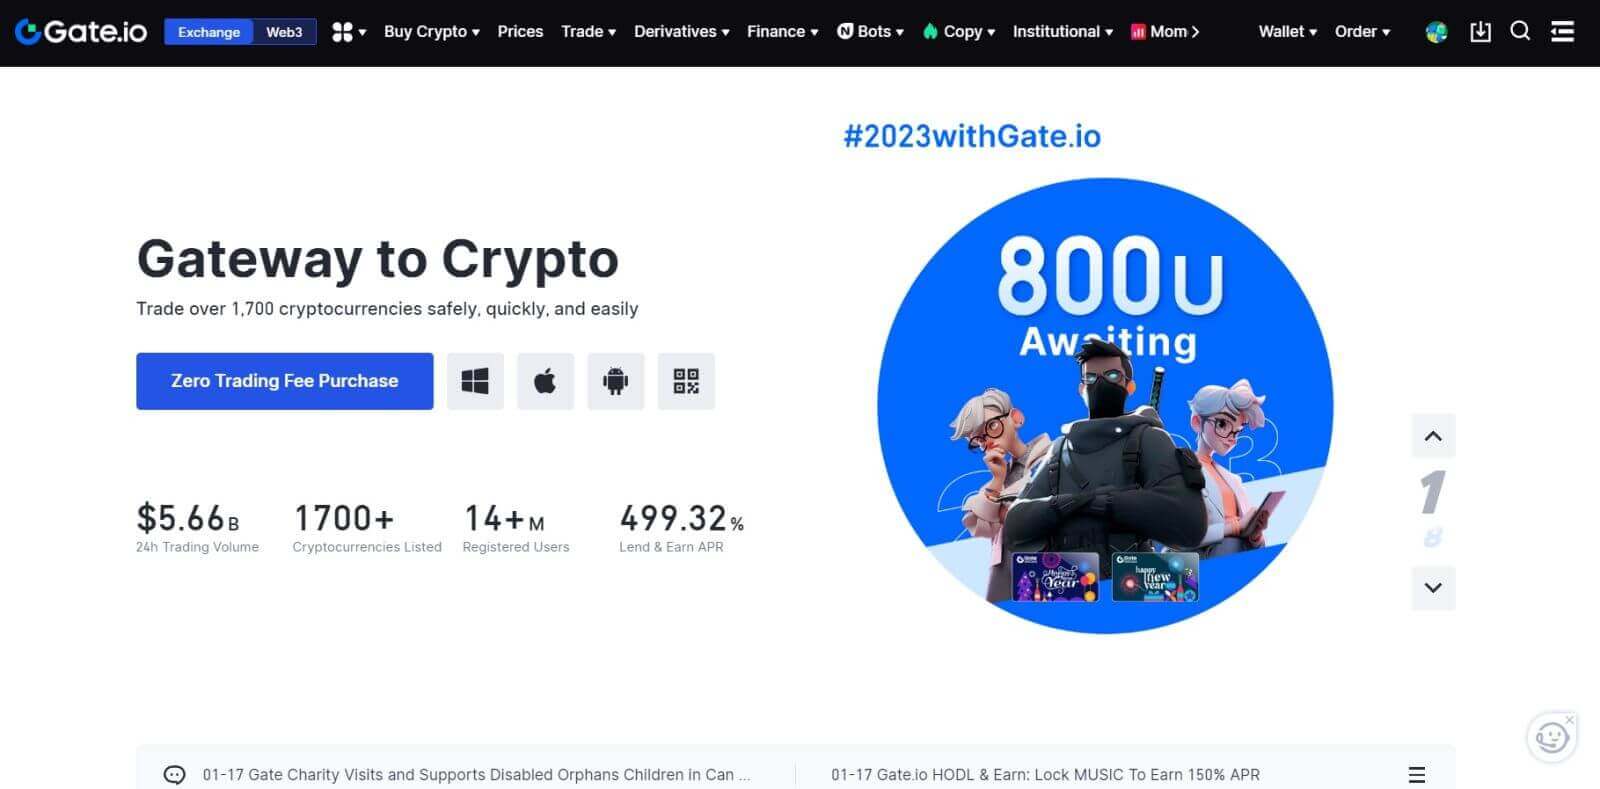
 8. Congratulations! You have successfully created a Gate.io account via Telegram.
How to Register Account on Gate.io App
1. You need to install the Gate.io application to create an account for trading on the Google Play Store or App Store.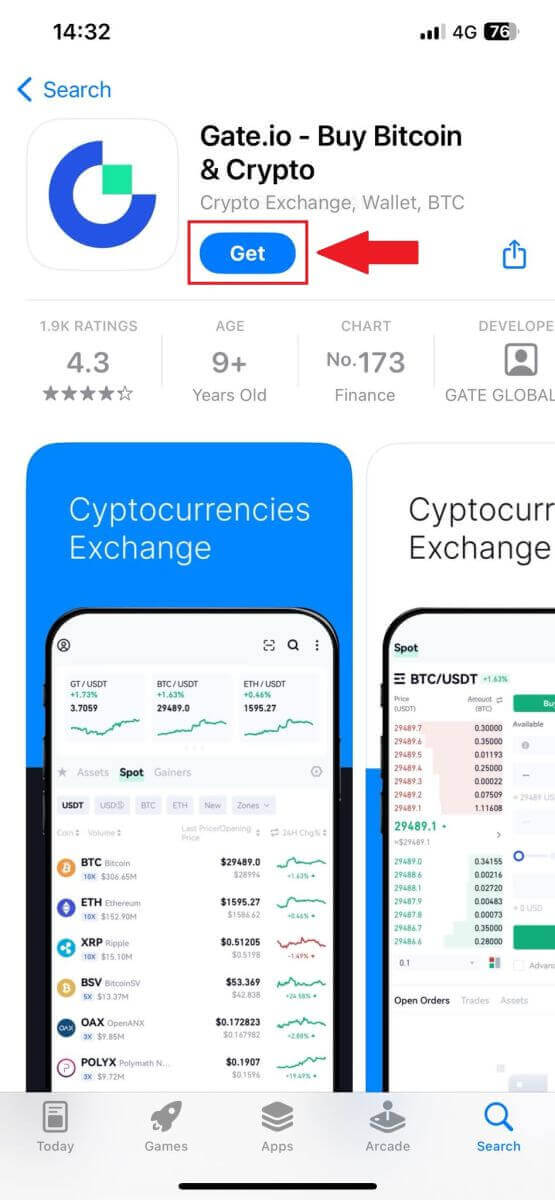
2. Open the Gate.io app, tap the [Profile] icon, and tap [Sign Up].
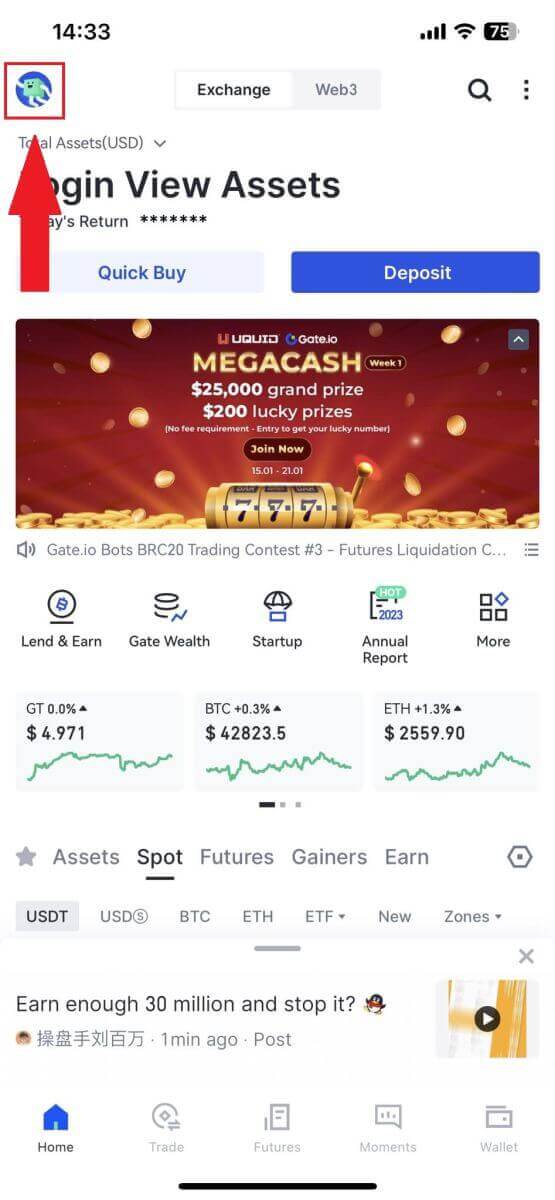
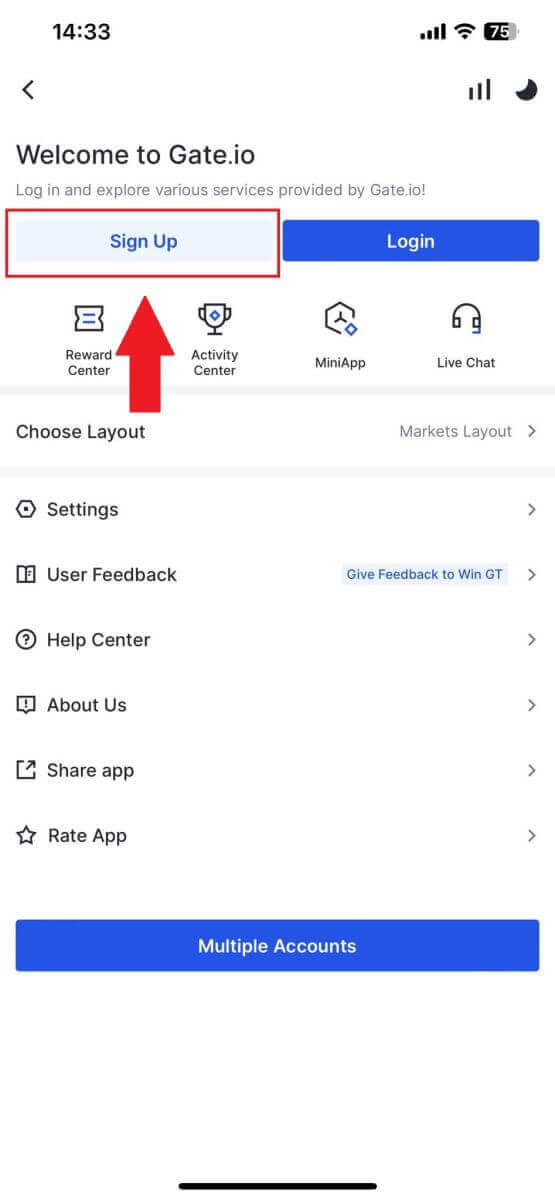
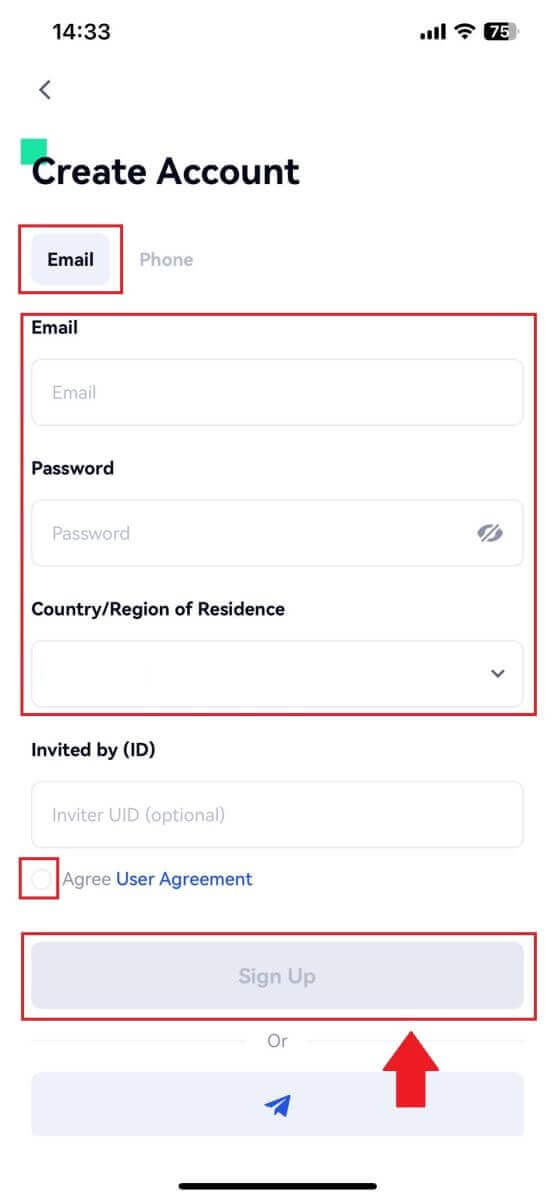
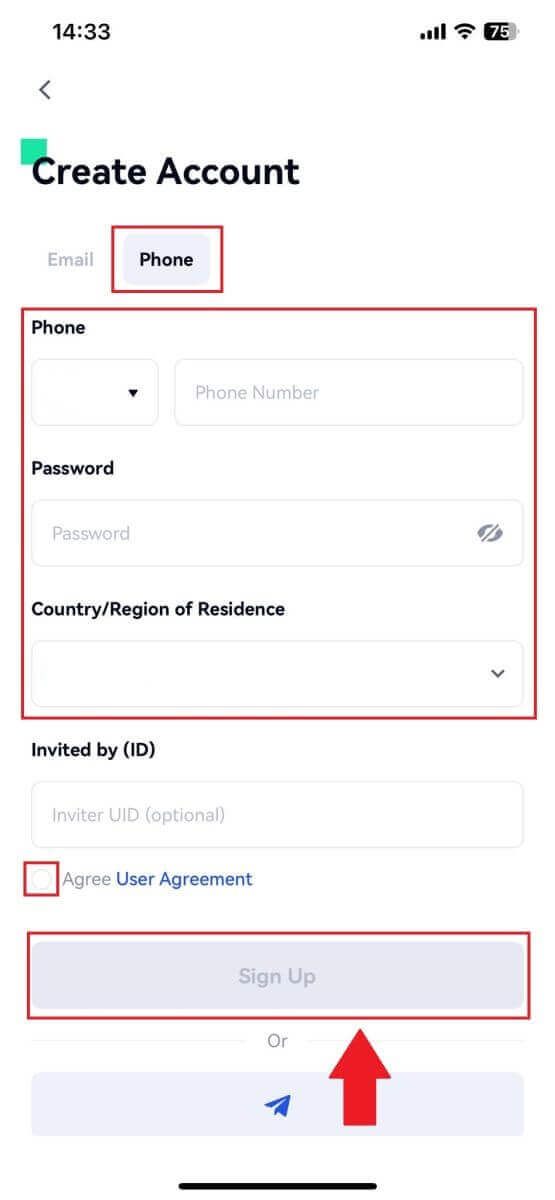
3. Select [Email] or [Phone] and enter your email address or phone number. Then, create a secure password for your account.
Choose your [Country/Region of Residence], tick on the box, and click on [Sign Up].
Note:
- Your password must contain at least 8 characters, including one uppercase letter and one number.
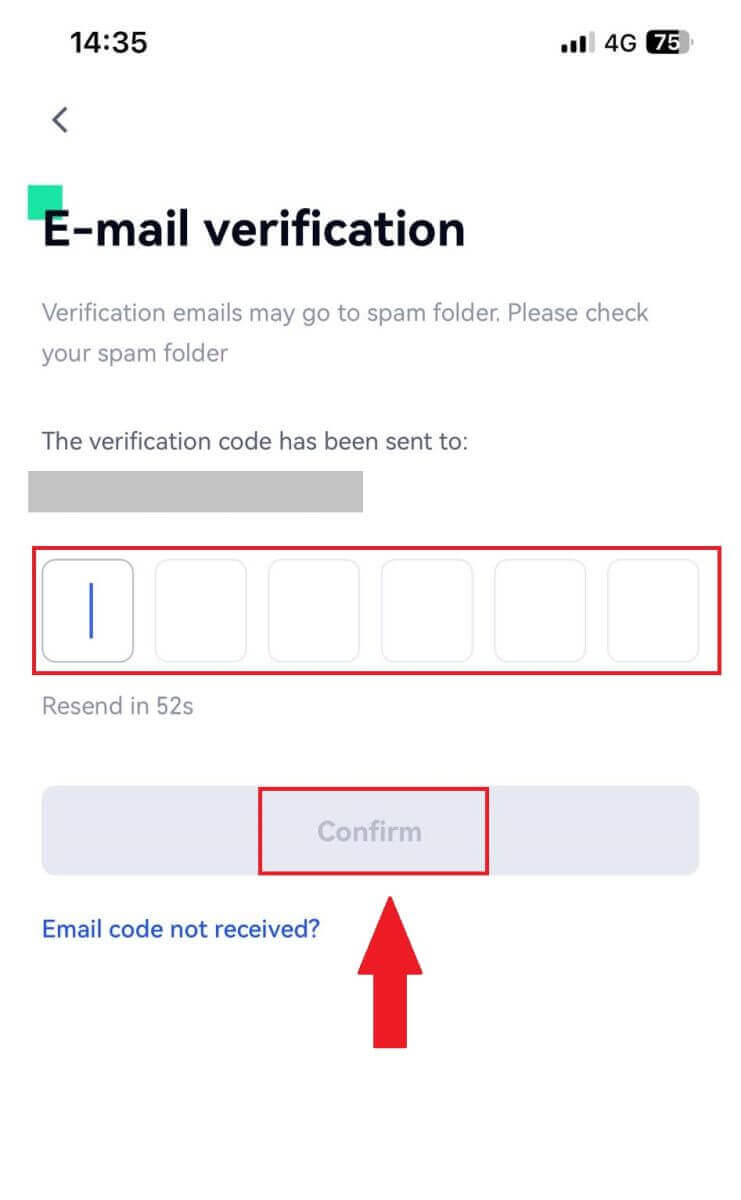
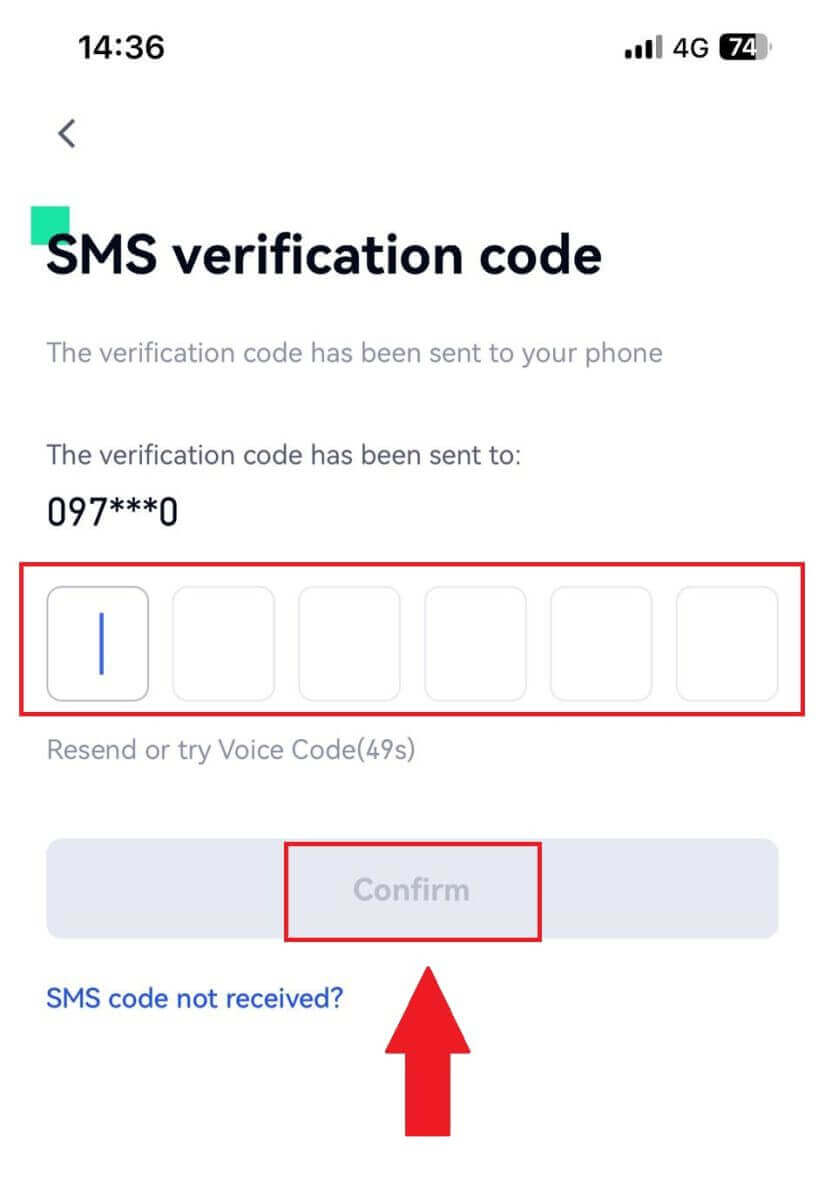
4. You will receive a 6-digit verification code in your email or phone. Enter the code then, click the [Confirm] button.
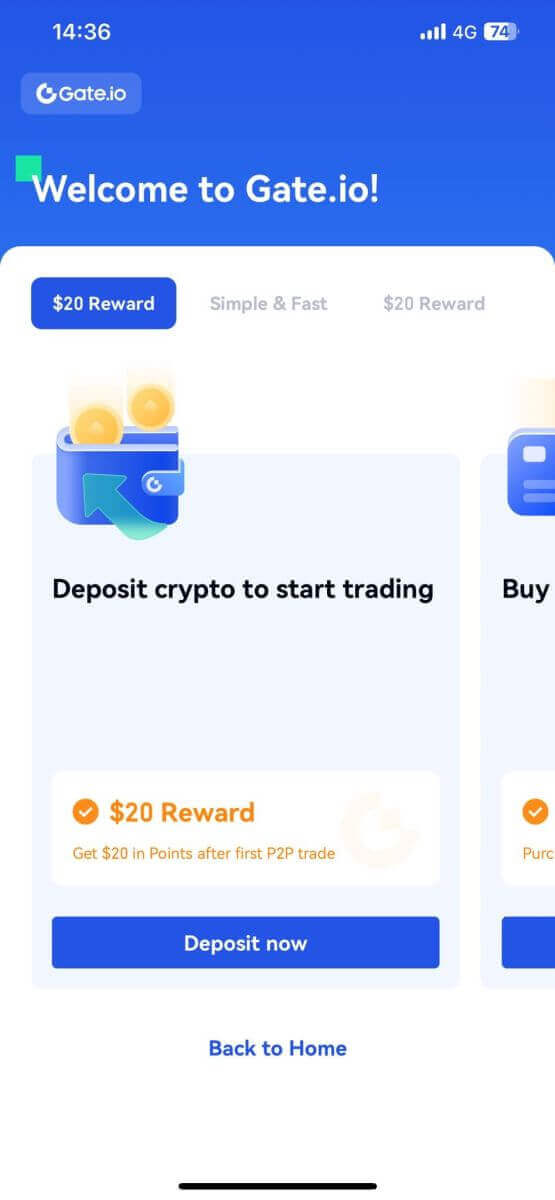
5. Congratulations! You have successfully created an Gate.io account on your phone.
Or you can sign up on the Gate.io app using Telegram.
Frequently Asked Questions (FAQ)
Why Can’t I Receive Emails from Gate.io?
If you are not receiving emails sent from Gate.io, please follow the instructions below to check your email’s settings:1. Are you logged in to the email address registered to your Gate.io account? Sometimes you might be logged out of your email on your device and hence can’t see Gate.io emails. Please log in and refresh.
2. Have you checked the spam folder of your email? If you find that your email service provider is pushing Gate.io emails into your spam folder, you can mark them as “safe” by whitelisting Gate.io email addresses. You can refer to How to Whitelist Gate.io Emails to set it up.
3. Is the functionality of your email client or service provider normal? To be sure that your firewall or antivirus program isn’t causing a security conflict, you can verify the email server settings.
4. Is your inbox packed with emails? You won’t be able to send or receive emails if you have reached the limit. To make room for new emails, you can remove some of the older ones.
5. Register using common email addresses like Gmail, Outlook, etc., if at all possible.
How come I can’t get SMS verification codes?
Gate.io is always working to improve the user experience by expanding our SMS Authentication coverage. Nonetheless, certain nations and regions aren’t currently supported.Please check our global SMS coverage list to see if your location is covered if you are unable to enable SMS authentication. Please use Google Authentication as your primary two-factor authentication if your location is not included on the list.
The following actions should be taken if you are still unable to receive SMS codes even after you have activated SMS authentication or if you are currently living in a nation or region covered by our global SMS coverage list:
- Make sure there is a strong network signal on your mobile device.
- Disable any call blocking, firewall, anti-virus, and/or caller programs on your phone that might be preventing our SMS Code number from working.
- Turn your phone back on.
- Instead, try voice verification.
How To Enhance Gate.io Account Security
1. Password Settings: Please set a complex and unique password. For security purposes, make sure to use a password with at least 8 characters, including at least one uppercase and lowercase letter, one number. Avoid using obvious patterns or information that is easily accessible to others (e.g. your name, email address, birthday, mobile number, etc.).
- Password formats we do not recommend: lihua, 123456, 123456abc, test123, abc123
- Recommended password formats: Q@ng3532!, iehig4g@#1, QQWwfe@242!
2. Changing Passwords: We recommend that you change your password regularly to enhance the security of your account. It is best to change your password every three months and use a completely different password each time. For more secure and convenient password management, we recommend you to use a password manager such as "1Password" or "LastPass".
- In addition, please keep your passwords strictly confidential and do not disclose them to others. Gate.io staff will never ask for your password under any circumstances.
3. Two-Factor Authentication (2FA)
Linking Google Authenticator: Google Authenticator is a dynamic password tool launched by Google. You are required to use your mobile phone to scan the barcode provided by Gate.io or enter the key. Once added, a valid 6-digit authentication code will be generated on the authenticator every 30 seconds.
4. Beware of Phishing
Please be vigilant of phishing emails pretending to be from Gate.io, and always ensure that the link is the official Gate.io website link before logging into your Gate.io account. Gate.io staff will never ask you for your password, SMS or email verification codes, or Google Authenticator codes.
How to Trade Crypto at Gate.io
How to Trade Spot on Gate.io (Website)
Step 1: Login to your Gate.io account, click on [Trade], and select [Spot].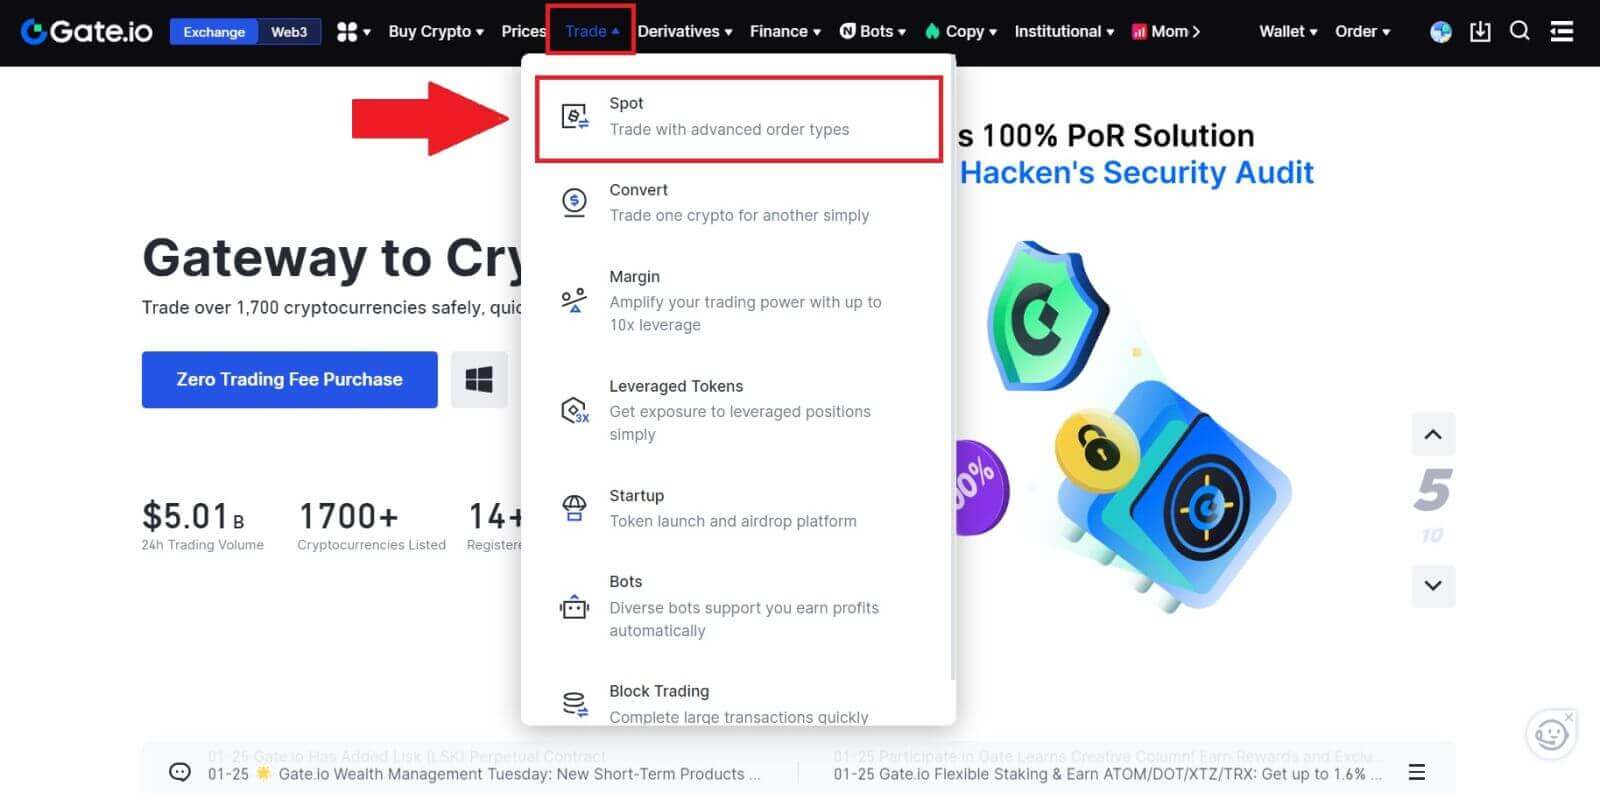
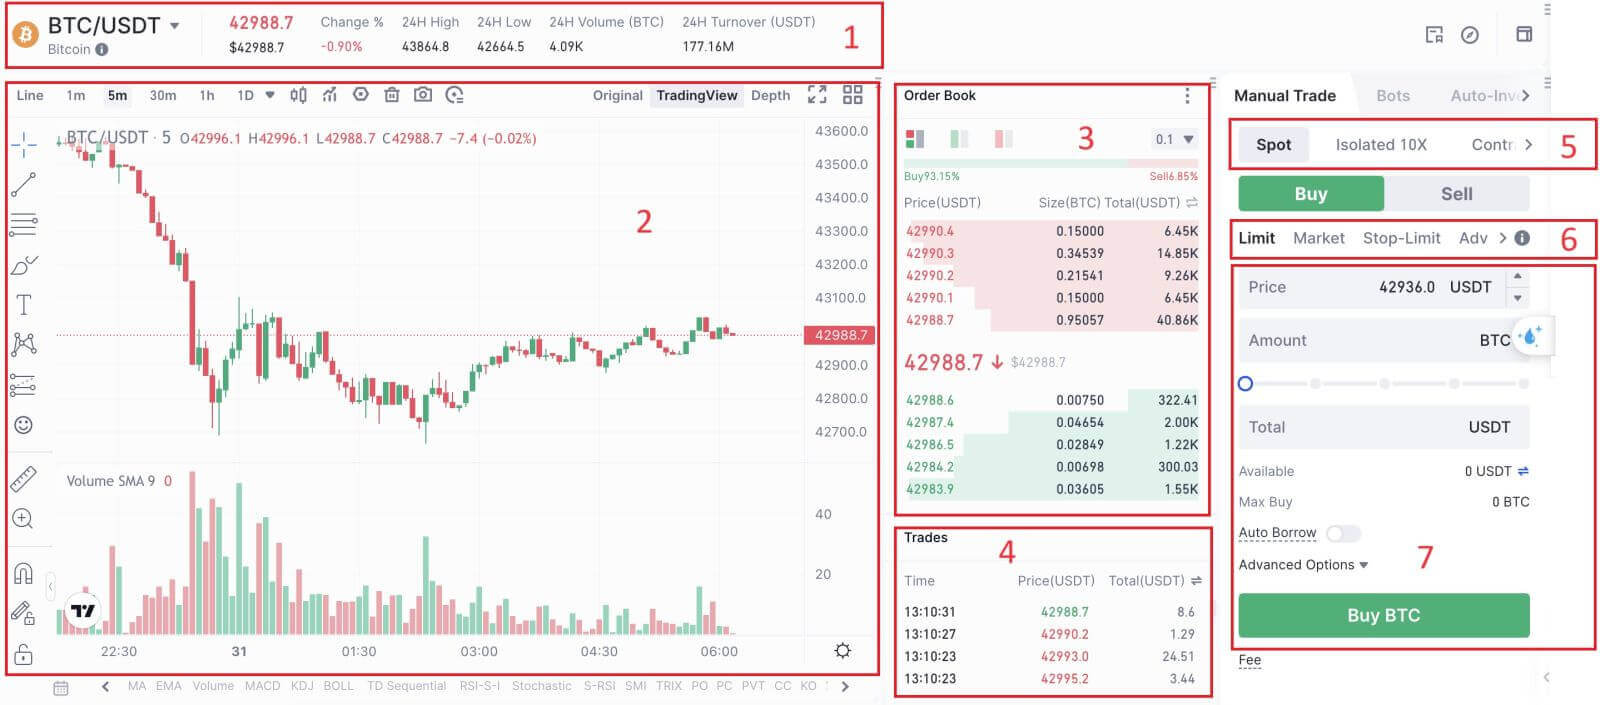

- Market Price Trading volume of trading pair in 24 hours.
- Candlestick chart and Technical Indicators.
- Asks (Sell orders) book / Bids (Buy orders) book.
- Market latest completed transaction.
- Trading Type.
- Type of orders.
- Buy / Sell Cryptocurrency.
- Your Limit Order / Stop-limit Order / Order History.
Step 3: Buy Crypto
Let’s look at buying some BTC.
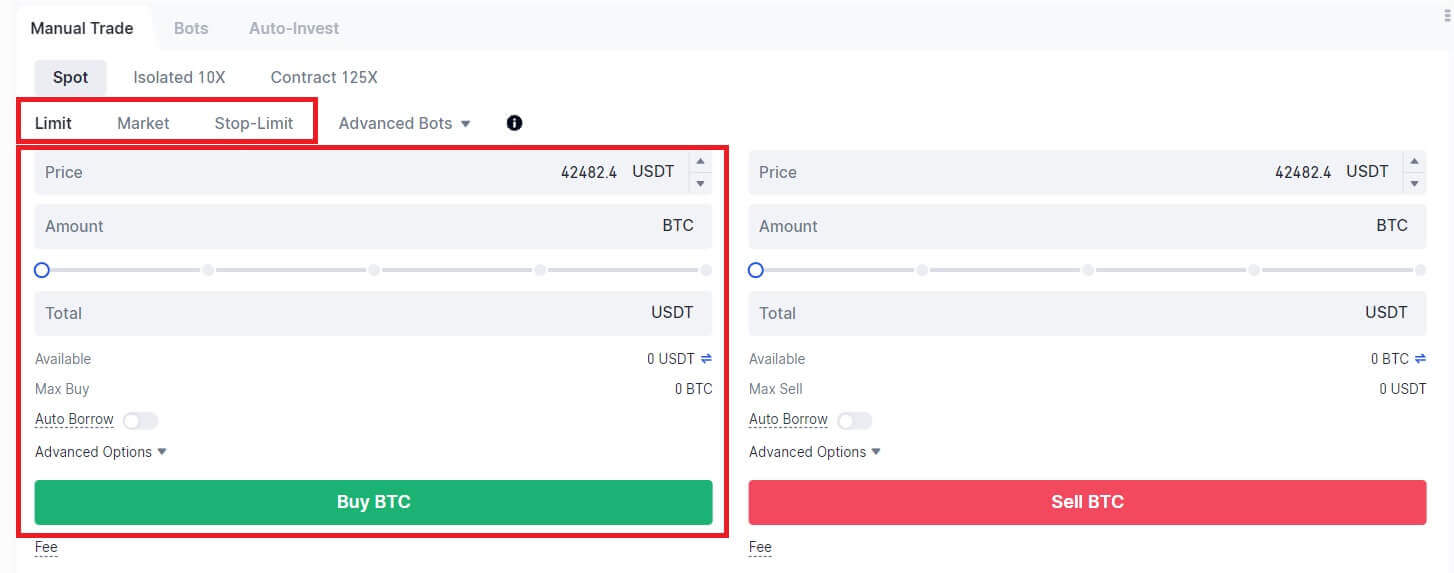
Go to the buying section (7) to buy BTC and fill in the price and the amount for your order. Click on [Buy BTC] to complete the transaction.
Note:
- The default order type is a limit order. You can use a market order if you want an order filled as soon as possible.
- The percentage bar below the amount refers to what percentage of your total USDT assets will be used to buy BTC.
Step 4: Sell Crypto
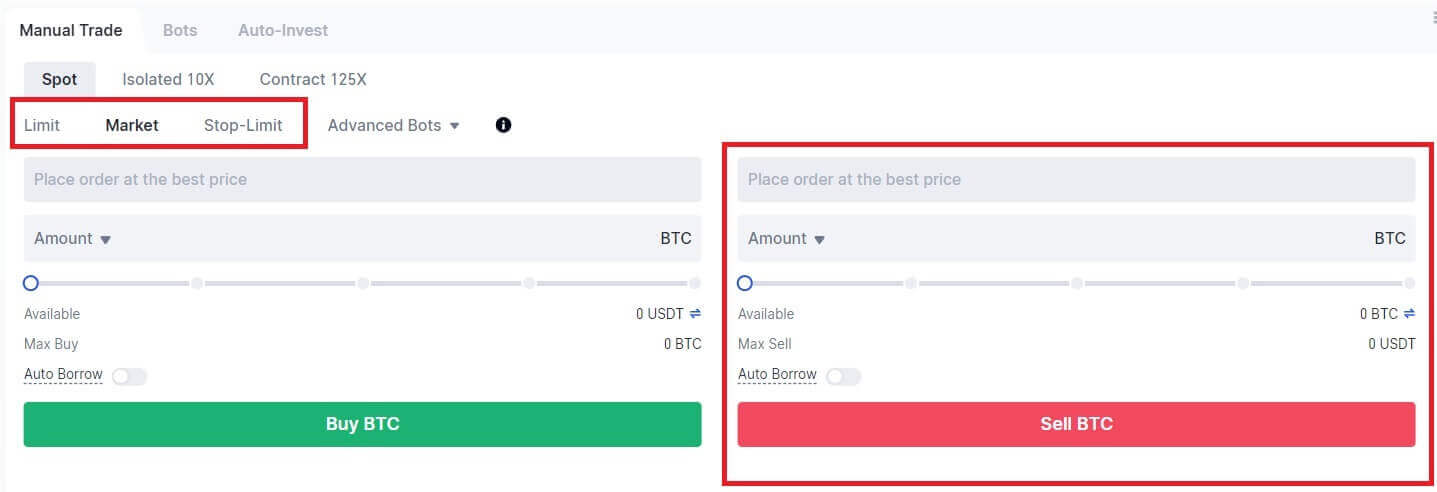
To promptly sell your BTC, consider switching to a [Market] order. Enter the selling quantity as 0.1 to complete the transaction instantly.
For example, if the current market price of BTC is $63,000 USDT, executing a [Market] Order will result in 6,300 USDT (excluding commission) being credited to your Spot account immediately.
How to Trade Spot on Gate.io (App)
1. Open your Gate.io app, on the first page, tap on [Trade].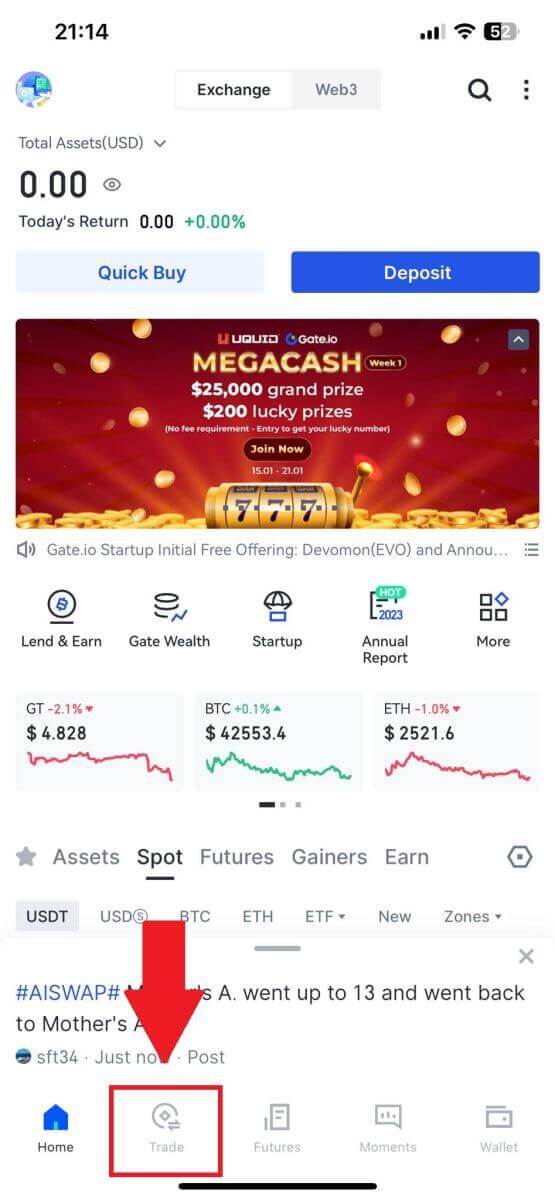
2. Here is the trading page interface.
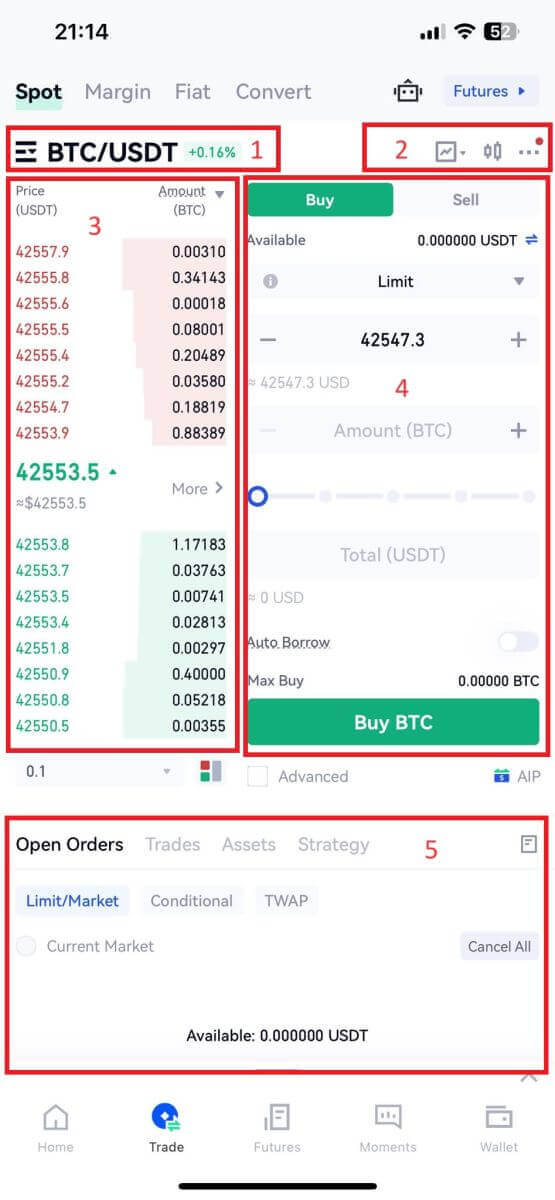
- Market and Trading pairs.
- Real-time market candlestick chart, supported trading pairs of the cryptocurrency, “Buy Crypto” section.
- Sell/Buy Order Book.
- Buy/Sell Cryptocurrency.
- Open orders.
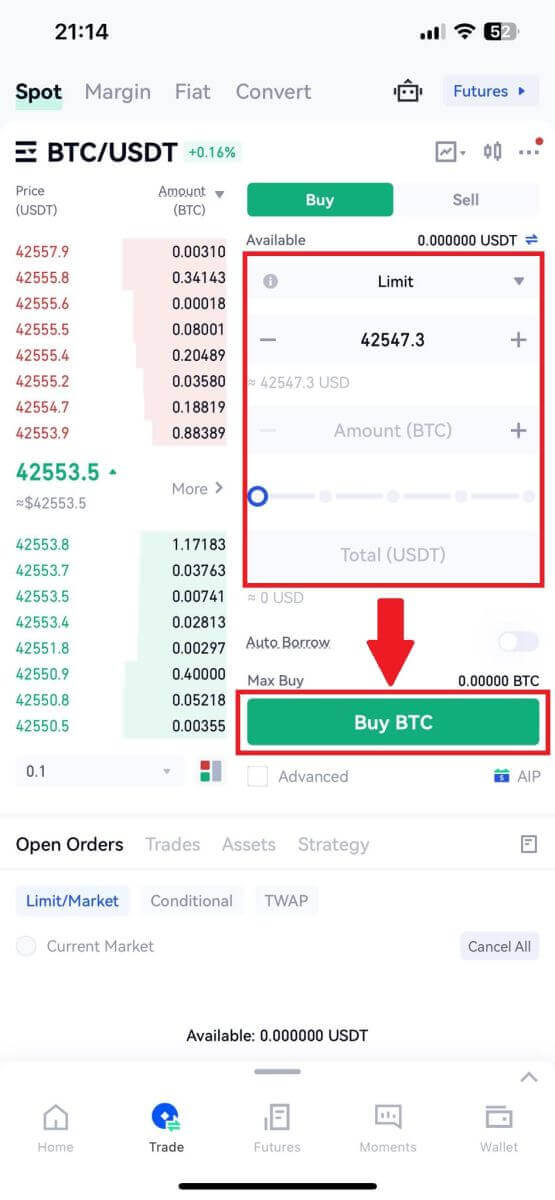
3. As an example, we will make a "Limit order" trade to buy BTC.
Enter the order placing section of the trading interface, refer to the price in the buy/sell order section, and enter the appropriate BTC buying price and the quantity or trade amount.
Click [Buy BTC] to complete the order. (Same for sell order)
What is the Stop-Limit Function and How to use it
What is a stop-limit order?
A stop-limit order is a limit order that has a limit price and a stop price. When the stop price is reached, the limit order will be placed on the order book. Once the limit price is reached, the limit order will be executed.
- Stop price: When the asset’s price reaches the stop price, the stop-limit order is executed to buy or sell the asset at the limit price or better.
- Limit price: The selected (or potentially better) price at which the stop-limit order is executed.
You can set the stop price and limit price at the same price. However, it’s recommended that the stop price for sell orders should be slightly higher than the limit price. This price difference will allow for a safety gap in price between the time the order is triggered and when it is fulfilled. You can set the stop price slightly lower than the limit price for buy orders. This will also reduce the risk of your order not being fulfilled.
Please note that after the market price reaches your limit price, your order will be executed as a limit order. If you set the stop-loss limit too high or the take-profit limit too low, your order may never be filled because the market price cannot reach the limit price you set.
How to create a stop-limit order
How does a stop-limit order work?
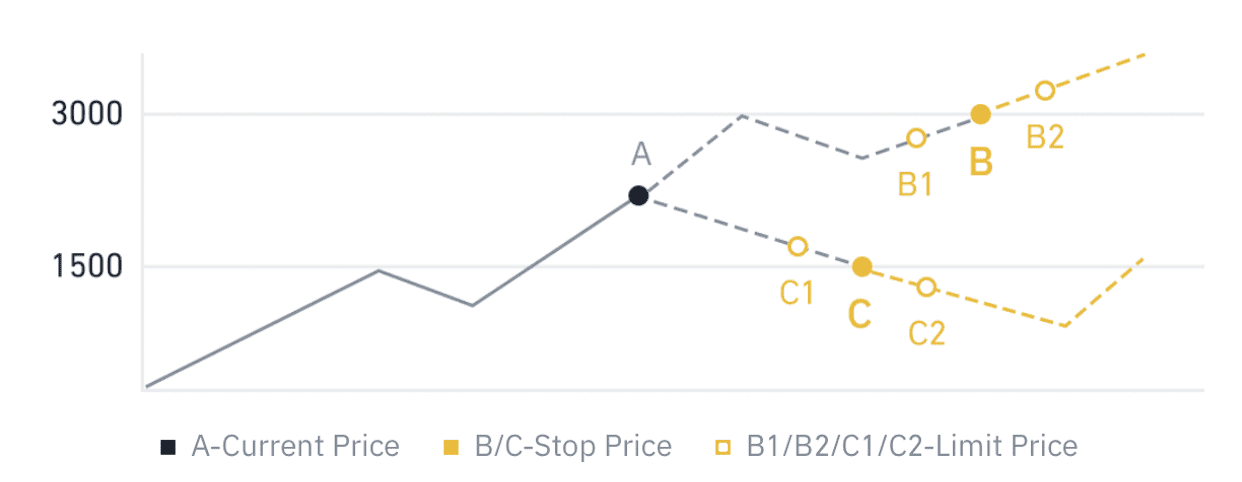
The current price is 2,400 (A). You can set the stop price above the current price, such as 3,000 (B), or below the current price, such as 1,500 (C). Once the price goes up to 3,000 (B) or drops to 1,500 (C), the stop-limit order will be triggered, and the limit order will be automatically placed on the order book.
Note
Limit price can be set above or below the stop price for both buy and sell orders. For example, stop price B can be placed along with a lower limit price B1 or a higher limit price B2.
A limit order is invalid before the stop price is triggered, including when the limit price is reached ahead of the stop price.
When the stop price is reached, it only indicates that a limit order is activated and will be submitted to the order book, rather than the limit order being filled immediately. The limit order will be executed according to its own rules.
How to place a stop-limit order on Gate.io?
1. Login to your Gate.io account, click on [Trade], and select [Spot].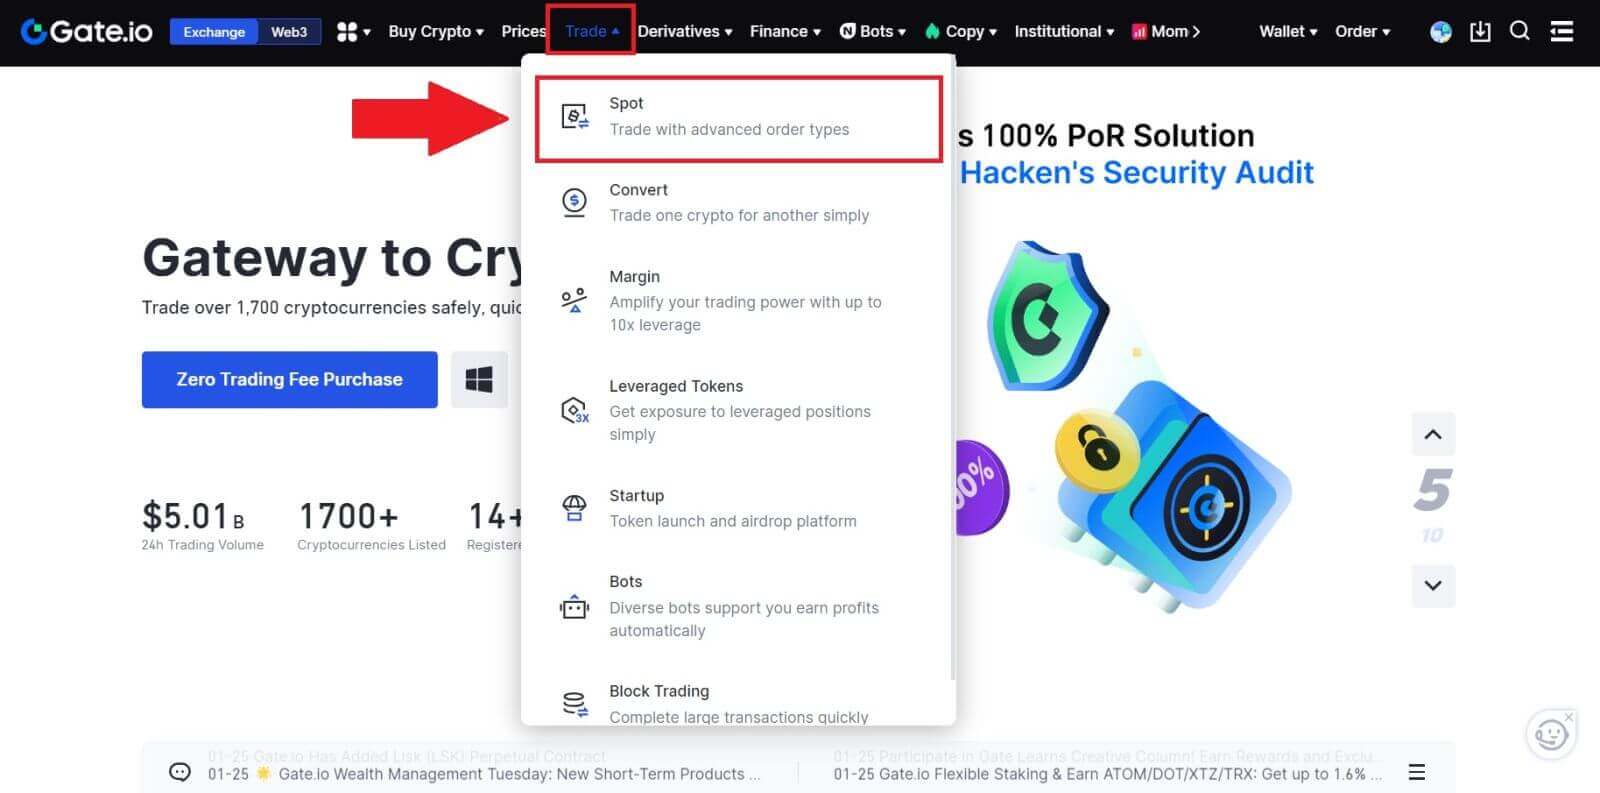
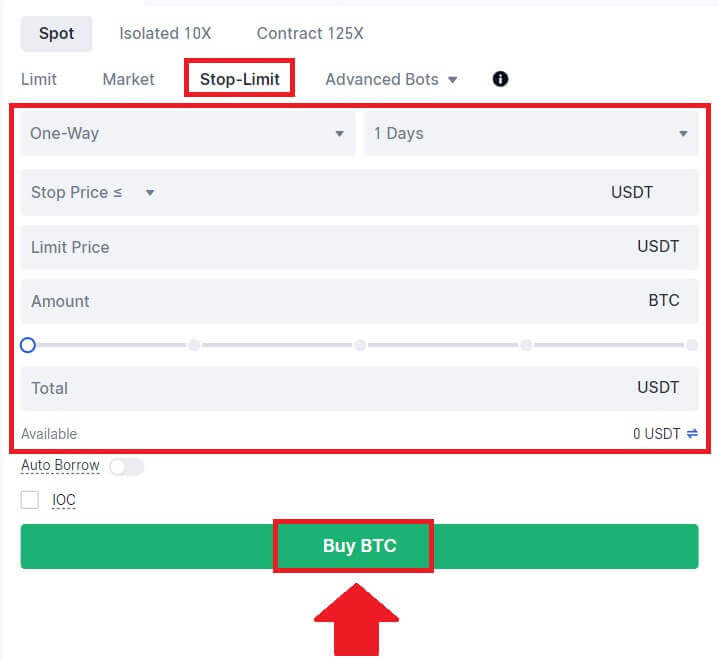
2. Select [Stop-limit], enter the stop price, limit price, and the amount of crypto you wish to purchase.
Click [Buy BTC] to confirm the details of the transaction.
How do I view my stop-limit orders?
Once you submit the orders, you can view and edit your stop-limit orders under [Open Orders].
 To view executed or canceled orders, go to the [Order History] tab.
Frequently Asked Questions (FAQ)
What is Limit Order
A limit order is an instruction to buy or sell an asset at a specified limit price, and it is not executed immediately like a market order. Instead, the limit order is activated only if the market price reaches or exceeds the designated limit price favorably. This allows traders to target specific buying or selling prices different from the current market rate.
For example:
-
If you set a buy limit order for 1 BTC at $60,000 while the current market price is $50,000, your order will be filled at the prevailing market rate of $50,000. This is because it is a more favorable price than your specified limit of $60,000.
-
Similarly, if you place a sell limit order for 1 BTC at $40,000 when the current market price is $50,000, your order will be executed at $50,000, as it is a more advantageous price compared to your designated limit of $40,000.
In summary, limit orders provide traders with a strategic means to control the price at which they buy or sell an asset, ensuring execution at the specified limit or a better price in the market.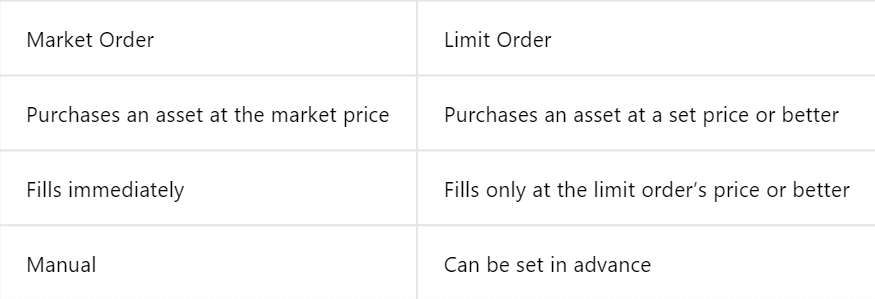
What is Market Order
A market order is a trading order executed promptly at the current market price. It is fulfilled as quickly as possible and can be used for both buying and selling financial assets.
When placing a market order, you can specify either the quantity of the asset you want to buy or sell (denoted as [Amount]) or the total amount of funds you wish to spend or receive from the transaction (denoted as [Total]).
For example:
- If you want to purchase a specific quantity of MX, you can directly enter the amount.
- If you aim to acquire a certain amount of MX with a specified sum of funds, such as 10,000 USDT, you can use the [Total] option to place the buy order. This flexibility allows traders to execute transactions based on either a predetermined quantity or a desired monetary value.
How to View my Spot Trading Activity
You can view your spot trading activities from the Orders and Positions panel at the bottom of the trading interface. Simply switch between the tabs to check your open order status and previously executed orders.
1. Open Orders
Under the [Open Orders] tab, you can view the details of your open orders. 2. Order History
Order history displays a record of your filled and unfilled orders over a certain period.  3. Trade History
To view trade history, use the filters to customize the dates and click [Search].

